The addressing sorts and constraints provide a great deal of control over the manner in which tubes are allocated to chains. Show designers usually avoid splitting chains across racks if at all possible. They usually prefer filling racks entirely with chains or singles — one or the other — if that’s possible. When that’s not possible, such as when the chain sizes don’t match up evenly with the rack sizes, they usually prefer filling up the extra tubes in the racks with singles. The addressing sorts and constraints can take all of these preferences into account, and can provide a clean, optimal allocation of tubes to chains automatically.

Figure 1 – Example show with eight 6-shell chains.
Figure 1 shows the timeline of a show with five singles, followed by eight 6-shell chains, followed by five more singles. This show will serve as an example for using addressing constraints and sorts to allocate the right tubes for the chains. There are a total of 5 + 8 * 6 + 5 = 58 shells in this show. The 3” racks in the Generic Effects collection have 10 tubes per rack, so the “Racks > Add racks for show…” function, which is used to add the minimum number of racks for the show, will add six racks to the show. We’ll start the example by assigning tubes in those six racks with the default addressing configuration.
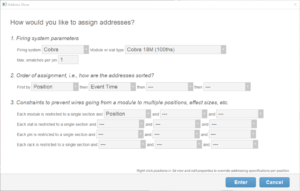
Figure 2 – Default addressing dialog, sorting by event time.
The “Addressing > Address show…” menu item brings up the dialog in Figure 2, by default, which sorts the addresses in a position by event time, and doesn’t have any constraints other than preventing module wires from stretching across positions.
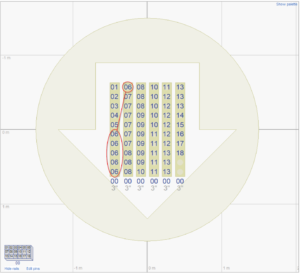
Figure 3 – Problem! The six shells of the pin 06 chain split across racks (as do others).
The default addressing configuration assigns addresses and tubes in chronological order, sorted by event time. Without anything to suggest otherwise, the assignment proceeds with the first chronological shell in the first tube of the first rack, then the second, third, and so on, until reaching the first chain (pin 06), whose shells continue to fill the first rack and spill into the second. This illustrates the problem: the chains are split across racks.
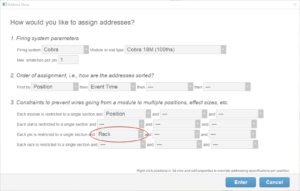
Figure 4 – Add “Pin restricted to RACK” to restrict shells on the same pin to a single rack.
The easiest solution to prevent chains from splitting across racks is to add the constraint that Each pin is restricted to a single RACK. By definition, a chain has one ematch, on one pin. Thus all of the chain’s shells are associated with that one pin (pin 06 in Figure 3, for example). If that pin is restricted to a single rack, then all the shells associated with that pin — namely all the shells in the chain on that pin — will be restricted to the same rack, which prevents the splitting.
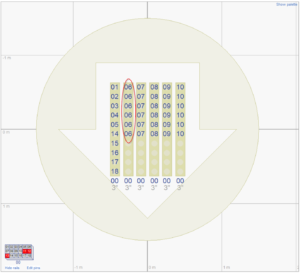
Figure 5 – Since chained shells are on the same pin, they must therefore be on the same rack.
Figure 5 shows the result of the Each pin is restricted to a single RACK constraint. The first five shells chronologically continue to fill the first five tubes of the first rack. But at that point, the chain on pin 06 can’t fit in the five remaining tubes in that rack so the entire chain is allocated to the second rack. The next chain (07) can’t fit in the remaining tubes in either of the first two racks, so it spills to the third rack, and so forth.
Unfortunately, with the added constraint we no longer have enough racks in the layout, so three chains remain unracked. The red pin numbers in the module diagram in the lower left are the indication that the shells on those pins are not fully racked. We’ll need to add a few more racks manually since the minimum number of racks is no longer sufficient, but first let’s rearrange the assignment order so the chains are assigned first, and the singles second.
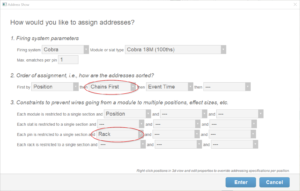
Figure 6 – Sorting chains first will allocate chains naturally and fill gaps with singles.
Re-addressing the show again with the Chains First criterion added to the assignment order as shown in Figure 6 will change the assignment order to begin with the six chains, followed by the ten singles, instead of beginning with five singles that are shot earlier than the chains.
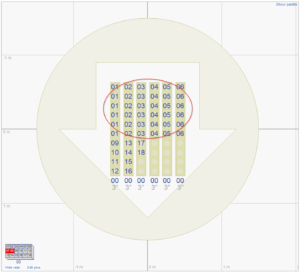
Figure 7 – Each chain nicely in a rack, leftovers filling the gaps. But what about the red pins?
The result of adding the Chains First criterion is a very natural rack assignment. The chains fill the racks nicely, and the singles fill the gaps leftover after assigning the chains. The only remaining problem is that two chains remain unracked, signified by the two red pins in the module diagram in the lower left.
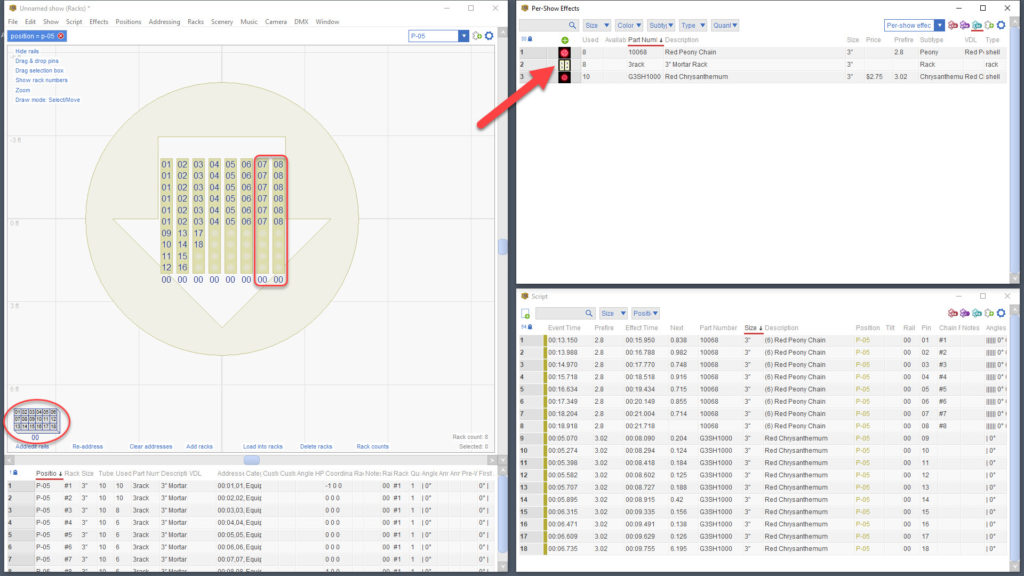
Figure 8 – When you prevent chains from splitting, you may need to add more racks!
Adding two more racks from the Effect window, and re-addressing with the same configuration as in Figure 6, is the final solution. Notice that the module diagram in the lower left has no red. The rack assignments are perfect.