Video 1 – How to Share Modules Across Multiple Positions
A common preference for addressing shows is that modules cannot be shared across launch positions. The reasoning is simple: stretching long e-matches between positions is usually a bad idea. Sometimes, however, groups of positions are close together or arranged in ways that make it a good idea to share modules within the groups, while still preventing sharing between the groups. Launch positions mounted on a tower or truss may be only a few feet apart, for example. The shoot site in Figure 1 is another example, an outdoor layout with three groups of positions that are intended to share modules.
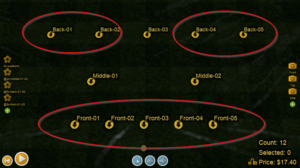
Figure 1 – Sharing example: the positions in each circle are intended to share modules.
The Section field of the position properties is the simplest way to control sharing on a small scale. The addressing functions of Finale 3D have a required constraint that modules cannot be shared across different sections, so you can control sharing by setting the Section field of the positions. By default, the Section field is blank.
The addressing functions also have other optional constraints. By default, one of the optional constraints is that modules cannot be shared across different positions, because that is the usual preference. If you remove this optional constraint then the only constraint controlling the sharing of modules is the Section field. By setting the Section field to unique values for each sharing group, you can control exactly what positions can share modules.
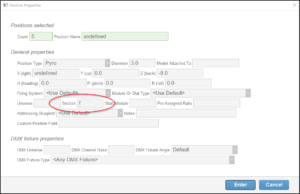
Figure 2 – Select the five front positions, right-click, and do “Edit properties” to set their Section.
You can set the Section field for positions by right clicking them and doing the function, “Edit properties” from the context menu. If you select multiple positions and then right click on them with all of them selected, you can set the Section field of multiple positions at the same time, as shown in Figure 2. Knowing that the addressing functions will not share modules across positions with different Sections, you will want to assign a unique Section value to the positions in each of the groups of Figure 1, and also a unique Section value to each independent position, which entails six Section values in all. The Section values can be words or numbers or anything. In this example, the letters a – f will suffice, as shown in Figure 3.
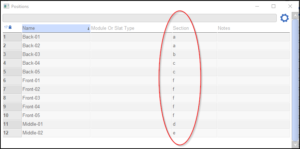
Figure 3 – It may be faster to set the Section values by editing directly in the Positions window.
Figure 3 also hints that it may be faster to set the Section values by editing the text in the Positions window. Use the “Edit Properties” dialog or the Positions window, whichever you find more convenient. Having set the Section values, if you then display the Racks window from the Window menu, you’ll see the site layout automatically includes blue lines around the sections, which you can look at to verify the section arrangement is right.
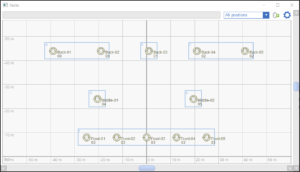
Figure 4 – The Racks window draws section boxes around the positions. Look how closely this window resembles the desired grouping in Figure 1.
When addressing a show using the “Addressing > Address show” function, you are given the opportunity to specify the module constraints in paragraph 3 of the dialog. The module constraints control whether modules can be shared across different positions, or different angles, sizes, or any other properties. By default, the optional module constraints include just “Position”, allowing modules to be used across any effects but only within the same position. To use sections for controlling sharing instead, please remove “Position” from paragraph 3 of the addressing dialog. The section constraint is always present, as shown in Figure 5.
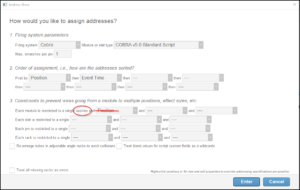
Figure 5 – The addressing functions always prevent sharing modules across sections. Remove the optional constraints so sections are the only module constraint.
If your firing system is the type that has modules with slats, you may want to restrict slats from being shared across positions by adding “Position” to the slat row in Figure 5 (below the red markings). That set of constraints distributes the module’s pins to multiple positions within the same section but only as they are grouped in the slats. The wires stretching between the positions are not the e-matches but are rather the cables connecting the slats to the module, or perhaps no wires at all if that connection is wireless. Distributing pins between positions as they are grouped in multiple distribution boxes or rails of terminals can be useful even for firing systems that do not have slats explicitly represented in the firing system addresses. You can apply this distribution scheme for those systems also, using “virtual slats” as described in Virtual slats and Slats, virtual slats, and splitter boxes.
Sharing modules between some positions and not others is an example of a broader issue that sometimes different parts of a show need to be addressed differently. The Pro version of Finale 3D has a feature called “Blueprints” that allows you to define different addressing rule sets for different parts of the show. You can use blueprints as an alternative to sections or along with sections. The merits of using blueprints depend on whether sharing modules is your only need, or whether module sharing is just one of many addressing considerations that can all be dealt with together using blueprints.
Addressing the show using blueprints (Pro only)
An addressing blueprint is basically a saved copy of the choices in the “Addressing > Address show” dialog. You can create and name an addressing blueprint from the “Addressing > Create addressing blueprint” function. If you want to address some of the positions in the show with module sharing allowed, and others not, then you’ll need two blueprints. You could, for instance, create a blueprint called “Sharing” with the “Position” constraint removed as shown in Figure 5, and a second blueprint called “No sharing” with the “Position” constraint intact.
Having created the two blueprints, you can divide the show’s positions into two groups, and assign the corresponding blueprints to the positions. Select all the positions for which module sharing should be allowed, then right click on that group of selected positions and choose “Edit properties” from the context menu. Assign them the “Sharing” blueprint from the blueprint selector on the “Edit properties” dialog. Then select all the other positions, edit properties, and assign them the “No sharing” blueprint. All that is left to do is to address the show, but instead of using the “Addressing > Address show” function, use “Addressing > Address show using blueprints assigned to positions”. This function will address the show sharing modules only among the positions within the “Sharing” group.