how to make Pillar Mine
-
AuthorPosts
-
 twfdlfireworks
Joined: Jan 2026 Posts: 4 Location: 台灣  Newcomer
您好,我來自台灣煙火表演公司,
是Finale3D的初學者。我買的是 Finale 3D Pro,
以下四個特效
是結合 VDL 和自訂特效編輯器製作的。目前已完成,所有項目均為平均值。
這不是我想要的效果(柱狀地雷),
因為台灣市場上常用的柱狀地雷種類繁多。https://www.youtube.com/watch?v=ZvwdIcjDFPA
URL 2、3 和 4 上的影片
然後會出現多種顏色變化。柱狀礦井感謝您的幫助。
twfdlfireworksJoined: Jan 2026 Posts: 4 Location: 台灣 Newcomer DrewFinale
Joined: Dec 2019 Posts: 777 Location: United States  Charcoal
Hi twfdlfireworks, welcome to the Finale 3D forum!
I know that pillar mines are very popular. We are planning to make it easier to create this kind of effect in the future. In the meantime, I can help you create custom pillar mines using the effect editor.
Here are some examples of pillar mine effects I have created. Are these better than the pillar mines that you have managed to create? If you like these effects, I would be happy to share them with you and give you instructions to make your own.
twfdlfireworksJoined: Jan 2026 Posts: 4 Location: 台灣 NewcomerDrewFinaleJoined: Dec 2019 Posts: 777 Location: United States CharcoalOkay, great!
First, let’s focus on how to make a single-color pillar mine. Here are some instructions:
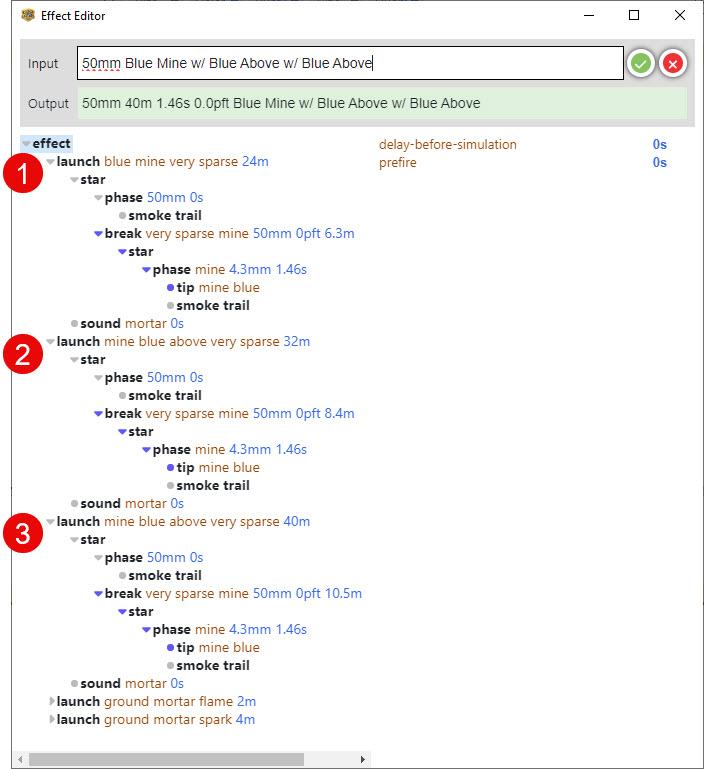
1. Create a new effect using this VDL: 50mm Blue Mine w/ Blue Above w/ Blue Above (this will create a three-layer blue mine)
2. Open the effect using the custom effect editor
3. In the effect editor, you will see three launch nodes. Each launch node corresponds to one layer of the mine.
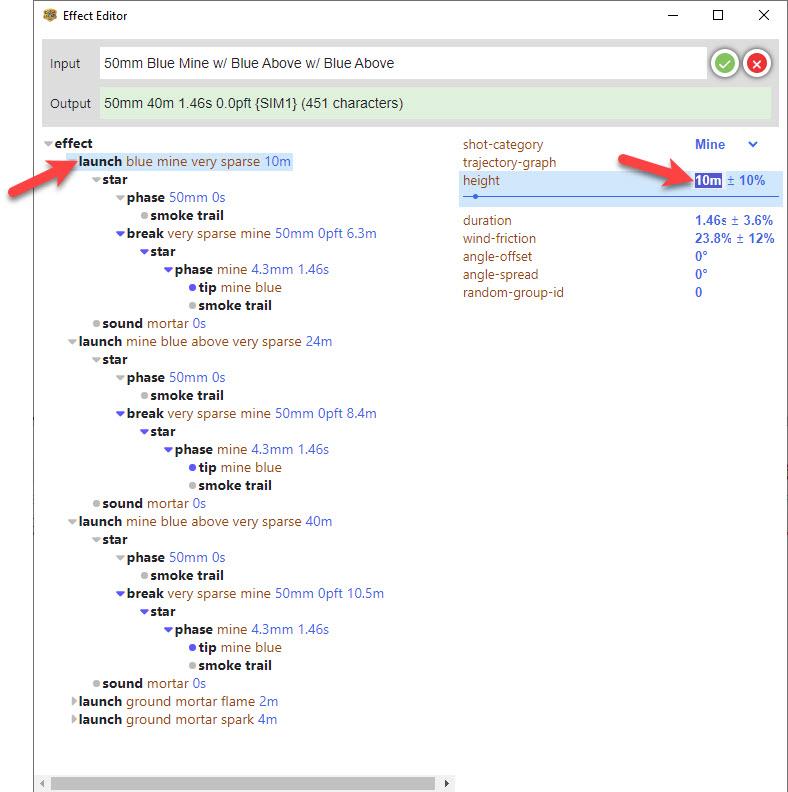
4. We will adjust the parameters for each layer of the mine one by one. To adjust the bottom layer of the mine, click on the first launch node to display its parameters, then change the height to 10m.
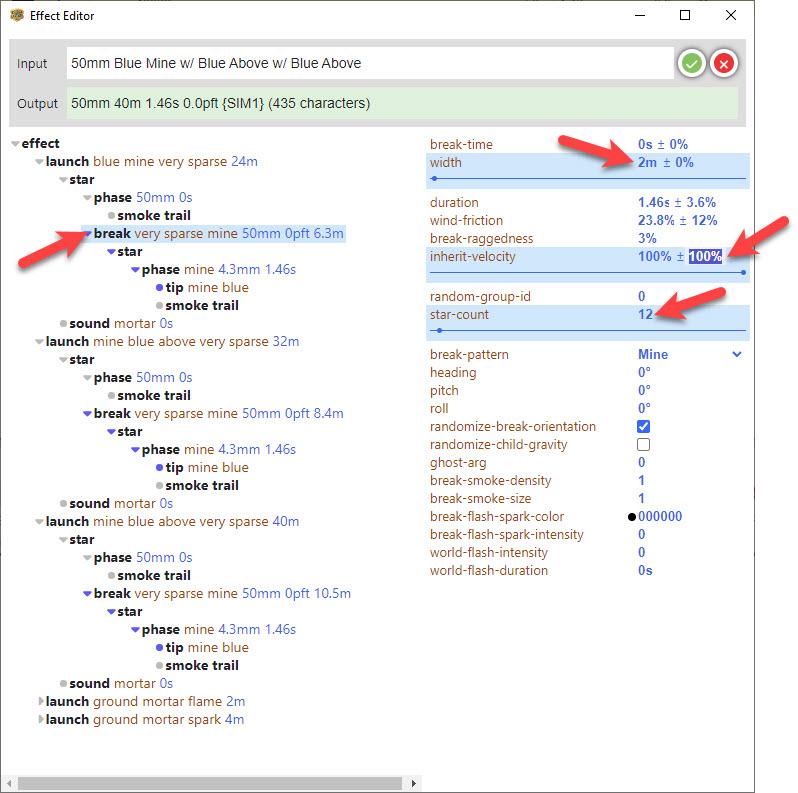
5. Click on the first break node and adjust the following parameters:
• width > 2m
• inherit-velocity > 100% ± 100%
• star-count > 126. Make these adjustments to configure the remaining two layers of the mine:
—For layer 2—
• launch > height > 24m
• break > width > 5m
• break > inherit-velocity > 100% ± 70%
• break > star-count > 20—For layer 3—
• launch > height > 40m
• break > width > 8m
• break > inherit-velocity > 100% ± 45%
• break > star-count > 357. Click the green check mark ✅ to save the effect. Your blue pillar mine is now complete!
DrewFinaleJoined: Dec 2019 Posts: 777 Location: United States CharcoalHere is a link for a show (.FIN) file containing some examples of pillar mines: https://finale3d.com/wp-content/uploads/2026/01/Sample-Pillar-Mines.fin
twfdlfireworksJoined: Jan 2026 Posts: 4 Location: 台灣 NewcomerDrewFinaleJoined: Dec 2019 Posts: 777 Location: United States CharcoalYou’re welcome!
Here are a couple more tips:
• If you want to make a pillar mine with more layers, just add more layers using VDL before editing in the effect editor. For example:
50mm Blue Mine w/ Blue Above w/ Blue Above <– three-layer mine
50mm Blue Mine w/ Blue Above w/ Blue Above w/ Blue Above <– four-layer mine
• If you want to make a pillar mine with color changes, it is easiest to add the color changes in VDL before editing in the effect editor. For example:
50mm Blue To Red Mine w/ Blue To Red Above w/ Blue To Red Above w/ Blue To Red Above <– four-layer mine with blue to red color change
• You can make adjustments to the timing of the color changes using the phase nodes in the effect editor.
• You can adjustment size and brightness of the stars using the caliber and intensity properties in the tip nodes in the effect editor.
-
AuthorPosts
Please login to reply to this topic.