Slave fixtures are a way to make multiple fixtures act in parallel. Fixtures are either master fixtures, or slave fixtures. You never add effects to slave fixtures in Finale 3D. Instead, you configure the slave fixtures to have the same DMX Universe and DMX Channel Base as a master fixture, whereupon the slave fixtures will display the same effects as the masters that they refer to. In the physical world, the slave fixtures can be wired to their masters in special “slave” mode, or they can simply be configured to listen to the same DMX channel range as the masters, just like in Finale 3D.
The advantage of using slave fixtures to design your shows is that if your show involves fixtures that you want to act in parallel, it is simpler to connect them as master/slaves and then design your show by inserting effects into the masters only, while seeing the results in all. That way, they are sure to act in parallel, and the show design is easier to manage on the timeline because you don’t need to add effects for the slaves. If you look all the way down at Figure 5, you’ll see a Wave Flamer show that uses slave fixtures and mirroring to produce an impressive effect with just a single effect in the show. The timeline has only a single bar in it!
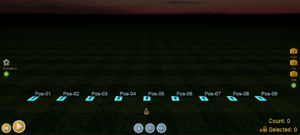
Figure 1 – Master fixtures are displayed as blue squares.
In Finale 3D, master fixtures are drawn as blue squares, as in Figure 1 which depicts what a show layout might look like after adding nine positions and configuring them as fixtures. Figure 2 shows the default channel ranges assigned to the fixtures if you leave the checkbox “Auto-assign DMX channel ranges” on in the “Configure as DMX fixtures” dialog when you initially configure them (right-click on the positions to get to the configuration dialog). In this example, the DMX Fixture Type is Explo X2 Wave Flamer, which has a six-channel DMX personality, so each fixture when configured so as to operate independently requires a channel range of six channels, as shown in the right-most column in the Figure 2 window.
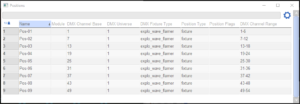
Figure 2 – Master fixtures need non-overlapping DMX channel ranges, which the “Auto-assign DMX channel ranges” provides.
If you want all nine fixtures to act in parallel, you need to designate one as the master and the others as slave fixtures. In the initial configuration shown in Figure 2, all the fixtures are masters (the Position Type column says “fixture” which implies master). The easiest thing to do is to leave the first fixture as it is, and re-configure the others to be slaves that refer to the first fixture as their master. Select fixtures 2-9 in the design view, then right-click on them to reconfigure them as slaves, as shown in Figure 3. Fill in the DMX Universe and DMX Channel Base to match the channel range of the master, which you can get from the positions window in Figure 2. Uncheck the “Auto-assign DMX channel ranges” checkbox because you are setting the channel ranges explicitly. In this case you do not want Finale 3D to auto-assign ranges to the fixtures.
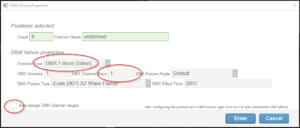
Figure 3 – To configure fixtures as slaves, set their DMX Universe and DMX Channel Base to match the master that they refer to.
After re-configuring the slave fixtures, the positions window will show the results depicted in Figure 4. The first fixture is a master; the others are slaves. All of them are listening to the same DMX channel ranges.
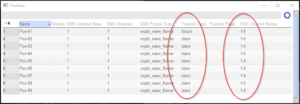
Figure 4 – The positions window shows whether slaves have the same DMX Universe and DMX Channel Base as their intended master.
Many DMX fixtures in the physical world have an option to configure the hardware to “mirror” or “tilt reverse” the angles of their effects. This option is a nice addition to the concept of slave fixtures, as it means that you can set up slave fixtures to act like their masters except being a mirror image, which is particularly useful for creating designs that feel symmetric on the left and right sides.
In Finale 3D you can similarly configure fixtures in the configuration dialog by changing their DMX Fixture Angle field to “Pan 180 (mirror)”. The scene of Figure 5 depicts a Wave Flamer show with only one effect in the entire show. That one effect is on the master fixture on the left. The other fixtures are all slaves to the master. The four fixtures on the right are mirrored in their configuration of the DMX Fixture Angle.
When you print out the “DMX Fixture Setup” report from the reports menu, the setup instructions include a note of the DMX Fixture Angle, to remind you when setting up the show of which fixtures need to be configured to “mirror” in the physical world.
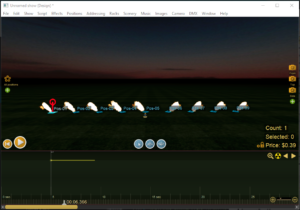
Figure 5 – Slave fixtures and mirroring can produce an impressive show with just a single effect on the timeline.