This example illustrates the steps to setup and design a flame show for the Explo X2 Wave Flamer using the Pyromac firing system. The example includes the use of,
- Explo X2 Wave Flamer pre-defined macros/programs
- Explo X2 Wave Flamer non-macro shots with user-defined angles
- Pyro effects used in the same show as the flames
- Safety channels turned on for the flame units for the flame part of the show
- A Pyromac script that contains both DMX and firing system outputs
The example show is 30 seconds long. It contains five flame positions, one per flame unit; and three pyro launch positions. It also contains five “safety” positions to hold the safety channel effects for the corresponding five flame units. The safety positions don’t exist in the real world; they just hold the safety channel effects in Finale 3D.
Since Explo X2 Wave Flamer fixtures incorporate the safety channel in the DMX personality of the fixture at a defined offset it is not necessary to use safety positions for Explo shows — you can just add the “DMX safety channel” effects directly to the Explo X2 Wave Flamer fixture positions. This example uses safety positions to explain the concept, since they are required for other types of flame systems (G-Flame, Flamaniac) for which safety channels are configured to their own DMX channels (not at pre-defined offsets relative to a Start Address).
From the front view when designing the show in Finale 3D, the show looks like Figure 1:
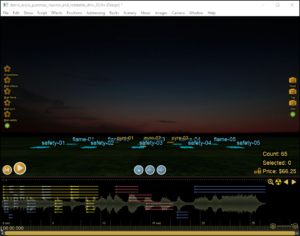
Figure 1 – An Explo X2 Wave Flamer macro shot in parallel from five positions
Setting up the show
Switch to top view in Finale 3D by clicking on the camera icon on the right side of the screen. Figure 2 shows the site layout from the top view perspective. When designing the show it is easiest to create a safety channel position for each DMX safety channel the show requires. The Explo X2 Wave Flamer flame units require a separate safety channel for each independent flame unit. The show contains five independent flame units, thus it requires five safety channels.
By comparison, if the flame units were listening to the same DMX channel range (firing in parallel) then the show would only need one safety channel. The flame units in this show are independent ,though, so they will be configured for different DMX channel ranges. Some other types of flame systems have independently configurable safety channel addresses that can be shared by flame units listening to different DMX channel ranges, but with the Explo X2 Wave Flamer system each DMX channel range has its own safety channel as part of the range.
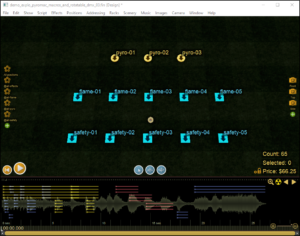
Figure 2 – Create separate positions for flame and pyro and safety (for Explo DMX flames, one safety per flame position).
As explained in Exporting a firing system script for flame systems, there are two ways to setup a DMX flame show, either: 1) each flame unit has its own DMX universe, or 2) each flame has its own range of DMX channels in a shared DMX universe. The Pyromac firing system is designed to support a single DMX universe that is shared by all the modules, and thus by all the flame units. So that makes the choice easy for this show: (2) is the only option.
After designing the show, you will do the menu item, “Addressing > Address show” to assign firing system addresses and DMX parameters to all the effects in the show; and then you’ll do the final step, “File > Export > Export firing system script(s)…” to export a script for your Pyromac firing system. The addressing functions depend on position DMX properties, which you can edit by right-clicking the positions and selecting “Configure as DMX fixture…” from the context menu. This menu item is also what will turn the yellow disk (pyro) positions into blue square DMX fixtures, as shown in the Figure 1 and Figure 2. The menu item brings up the dialog shown in Figure 3.
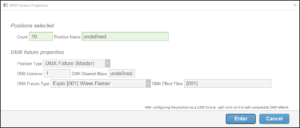
Figure 3 – Right-click positions and “Configure as DMX fixture…” to set up the flame and safety positions.
From this dialog, you will configure the flame and safety positions in the show as DMX fixtures, following the instructions in Table 1.
Table 1 – Configuration for DMX Fixture positions (flame and safety)
| Property | Instructions |
| Position Type | Set to “DMX Fixture (Master)”. |
| DMX Universe | Set to 1 for Pyromac, though it doesn’t really matter what number you set it to because it isn’t represented in Pyromac scripts. |
| DMX Channel Base | For each flame position, set the DMX Channel Base to whatever the flame unit’s physical “Start Address” will be in the real world (previous versions of Finale 3D required subtracting 1, which is no longer correct); set each safety position’s DMX Channel Base to be the same as its corresponding flame position (e.g., position flame-01 should have the same DMX Channel Base as safety-01). In the example show, the DMX Channel Bases are 1,7,13,19,25. Pyromac only supports channels up to 50, and each Explo X2 Wave Flamer DMX channel range consists of six channels, so the channel bases of 1,7,13,19,25 pack the ranges together back to back. |
| DMX Fixture Type | Choose “Explo [001] Wave Flamer”. |
| DMX Effect Filter | This field fills in automatically when you select the DMX Fixture Type, though you can change it if you want. The purpose of this field is to support the position’s right-click context menu item, “Add compatible DMX effect”. You obviously only want to add Explo effects to an Explo flame projector. The DMX Effect Filter reduces the list of effects shown in the context menu to those whose descriptions contain DMX Effect Filter text. |
Except for the DMX Channel Base field, the fields are the same for all the DMX fixture positions, so you can select all the DMX fixture positions and then right-click on one of them to configure them all as DMX fixtures at the same time. Then you can open the Positions window and manually type in the DMX Channel Base numbers for the relevant rows, Excel-style, as shown in Figure 4. Some columns in Figure 4 are hidden (use the blue gear menu in the upper right) to save space.
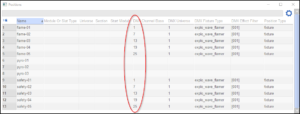
Figure 4 – It is easiest to set the DMX Channel Base numbers directly in the Positions window by typing them in, Excel-style.
Designing the show
To design this example show or other shows with Explo X2 Wave Flamer units, please follow these steps:
- Add flame effects. Right-click on the flame positions and do “Add compatible DMX effect” to add effects. If you insert “Explo DMX X2 Rotatable Flame Shot” effects, you can drag the tops of their trajectories in the 3D view to set their angle, and you can select groups of them and do functions like “Fan” to create interesting patterns. The first four seconds of the example show use only the Explo macro effects. The remaining flame effects in the show between seconds 5 and 10 are all “Explo DMX X2 Rotatable Flame Shot” effects. You can use the timing design functions like “Sequence” for any of the effects, but please only drag the trajectory tops to adjust the angles of the “Explo DMX X2 Rotatable Flame Shot” effects.
- Add pyro effects. Select the pyro positions you want to add effects to, and then click on the effect icons in the effects window to add effects. All the scripting functions like “Fan” and “Sequence” are available.
- Add safety channel effects. Right-click on the safety positions and do “Add compatible DMX effect” to add “Explo DMX Safety Channel” effects. Adjust their durations in the script window to cover the spans of time for which you want to arm the flame units. To see the duration column in the script window, go to the blue gear menu in the upper right of the script window and select the menu item, “Hide or unhide columns > Duration”. In the example show, the flames only last from the beginning of the show to about 9.5 seconds, so the safety channel durations are set to 9.5 in the script to cover that period of time.
Addressing and exporting the script
After designing the show, follow these steps to export a script for your Pyromac firing system:
- Address the show. The menu item, “Addressing > Address show…” brings up the dialog shown in Figure 5. In this example you don’t need to change much in the dialog at all. Just select the Pyromac firing system, and choose the module type. If you want, you can change the assignment order or the constraints, but none of those decisions will affect the DMX fixture positions or the DMX parts of the script. The configuration from Table 1 is all that matters for DMX.
- Export the script. Do the menu item, “File > Export > Export firing system script(s)…” to generate the script file for your firing system.
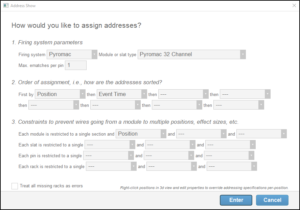
Figure 5 – Address the show with “Addressing > Address show…” just as you would for a pyro-only show.
Table 2 – Example files
| Download link | Explanation |
| demo_explo_pyromac_macros_and_rotatable_dmx.fin | Example show file |
| demo_explo_pyromac_macros_and_rotatable_dmx.txt | Example exported Pyromac DMX script |
| demo_explo_pyromac_plays_on_browser.mp4 | Video |
Video 1 – Render with water and camera motion