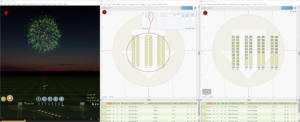
Rack layout in Finale 3D Pro is analogous to a CAD tool like Visio for visually laying out the racks in a top-down view, except the racks are logically connected to the effects in the show and the firing system addresses.
You begin by creating or customizing racks by defining their numbers of tubes, the arrangement and angles of the tubes, and constraints to control the kinds of effects that go into the racks. From the set of racks you define, Finale 3D produces an initial rack layout with the minimal number of racks to accommodate the show you’ve designed. From there, you can drag and drop the racks to organize them into pods or groups.
Finale 3D’s addressing functions like “Addressing > Address show…” will assign pins and tubes to the shots in the show, taking into consideration the racks and layout so e-matches don’t need to stretch between groups of racks. If you want to fine tune the wiring, you can drag and drop individual pin assignments between tubes and modules in the rack layout window. The final output is a set of reports and diagrams for the crew to follow to setup the show.
The three-step process
From start to finish, scripting a show with rack layout is a three step process:
- Design show
- Add racks for show
- Address show

Figure 1 – Three step process: 1) design, 2) add racks, 3) address show.
The order of these steps is significant, because it allows you to re-address the show (step 3) after making changes to the design — without blowing away the rack layout that you may have spent a lot of time arranging just right. It also allows you to re-use rack layouts from older shows by copying and pasting them between shows or creating a show file template with the positions and racks of a venue that you use repeatedly.
Adding racks for the show
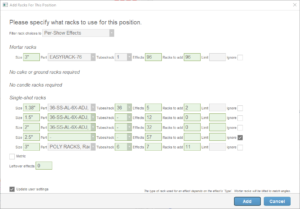
Add racks for a show design using the simple menu item, “Racks > Add racks for show…” or “Racks > Delete and re-add racks for show…” A dialog like the one shown in Figure 2 will appear with a list of all the types and sizes of effects that the show contains. For each type and size of effect, you can select what kind of rack applies.

Figure 2 – The “Add racks” dialog gives you choices of what racks to use for every size and type in the show.
When you click the “Add” button, the function will add however many racks are required, at the proper angles for the effects. The dialog of Figure 2 does give you choices of what racks to use, and also options to ignore specific sizes or types of effects in the show. For example, if you don’t use cake racks you can just click the “ignore” checkbox for the cakes in the dialog (not shown in Figure 2 because this example doesn’t have any cakes). Similarly, you can ignore any particular size effects or effects that have any specific “Rack Type” property (see Using the “Rack Type” field for fan racks). In the example, the 2.5″ single-shot effects are being ignored.
The collection filter at the top of the dialog filters your rack choices. You can customize your own racks with the “Racks > Create rack…” function, or you can use some of the pre-defined racks in the “Generic Effects” collection. You can also use “Easy Racks” which are available no matter what collection filter you choose. If you choose Easy Racks, you can specify the number of tubes per rack for each size on the fly, right in the dialog. Notice that the Easy Rack choice for 3″ mortar racks at the top of the Figure 2 dialog has a Tubes/rack field that is editable, whereas the other racks chosen for the single-shot effects have a Tubes/rack field that is not editable, as they are not Easy Racks.
The dialog shows on each row how many effects the show contains, and also how many racks are required (“Racks to add”) on the basis of your choice of rack. The number of tubes per rack obviously affects the number of racks required, but so do a number of other factors, like the angles of effects and the optional rack constraints that you can set up if you customize your own racks. If you have a limited number of racks in your physical inventory, you may choose to use the “Limit” field to impose a limit on the number of added racks for a size or type. The limit applies to the total number of racks of the specified size or type. If your show already has some racks and you are adding more racks after making a change, the limit takes into account both the existing racks and the racks to be added.
The “Leftover effects” row at the bottom of the dialog indicates if any effects do not fit in rack choices on account of their angles. Since the “Add racks” function automatically adds racks at the proper angles, leftover effects are rare and usually regarded as an error. The field can become non-zero if you select a rack that has pre-configured angles or a rack that is defined as non-rotatable. Ignored rows in the dialog do not contribute to leftovers.
Racks that you customize yourself can be made to be compatible with all effect sizes or with size ranges. If you select a fits-any-size rack for one of the rows in the Figure 2 dialog, other rows may become disabled on account of the fact that the racks added by your selected fits-any-size choice for one size will also accommodate the effects of another size. That’s why the 1.5″ and 2″ rack rows in Figure 2 are green. The 2.5″ row is green because it is ignored.
Rack layout view
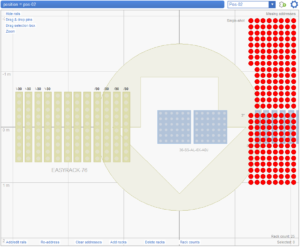
Figure 3 shows the rack layout view after adding racks for a position. The rack layout view is a feature of the Finale 3D Pro version. The Finale 3D Hobbyist version also supports racks but does not include the ability to lay them out visually. From the rack layout view, select the position you want to work on with the selector in the upper right. The added racks appear in an initial default layout. The effects in the position without firing system addresses appear as red circles. Effects with firing system addresses would appear as pin numbers in depictions in of firing system rails in the lower left, but at this moment the example does not yet have addresses assigned.

Figure 3 – Drag and drop the effects (red circles) into racks in the rack layout view (from the Window menu or shift-3).
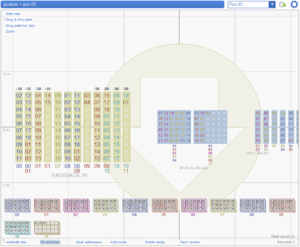
You can drag and drop effects directly into the racks, and you can also drag and drop to or from the rails at the bottom (see Figure 4). As you assign addresses by drag and drop or with the “Re-address” link or with the menu item “Addressing > Address show…” the red circles of the unaddressed effects disappear, as they are replaced by pin numbers in the rails and racks.
Toggle between the “drag and drop racks” mode versus the “drag and drop pins” mode with the link in the upper left. The convenient links at the bottom of the view operate solely on the position being edited. Click “Add racks” to add any additional racks to the position, if needed. Click “Delete racks” to start over for the position. The “Add/edit rails” link brings up a dialog to specify pre-assigned rails for the position. Use this link if you know in advance what firing system hardware you are going to have at the position rather than determining the requirements based on addressing the show.

Figure 4 – After clicking “Re-address” or the “Addressing > Address show…” menu item, the firing system rails and pins appear.
Addressing the show, taking racks into account
The “Addressing > Address show…” function assigns addresses for pins and tubes. If you haven’t added any racks, then the function just assigns addresses for pins, but if you’ve added any racks at all to the show, the function will attempt to assign pins and tubes.
The “Address show…” dialog has options for addressing constraints that take into consideration the racks and rack layout. If you want to restrict each module to a single rack, add “Rack” to the modules line in the constraints section of the addressing dialog, as in Figure 5. If you want to restrict each rack to a single module, add “Module” to the racks line in the constraints section. If you add both these constraints, then the modules and racks will be assigned one-to-one, which means exactly one module per rack.

Figure 5 – Adding the “Rack” constraint to modules and the “Module” constraint to racks
Restricting modules to racks is just one of the possible constraints. You can also restrict modules or racks to a single “Part Number” to optimize setup time in large shows, or restrict racks to single “Chain” to prevent multiple chains from sharing a rack, or to single “Chain-Or-Not” to prevent a module or rack from being used for a combination of chains and individual shells. You can use the dozens of other constraint options in the menus, or use “Custom Part Field” or “Custom Script Field” to create your own logical constraints.
The “Rack Cluster” constraint option in the modules line is particularly useful if you layout your racks into groups or pods, which Finale 3D calls “clusters”. Any racks that are snapped together in the rack layout view are considered part of the same cluster. Adding the “Rack Cluster” constraint to modules restricts each module to the same cluster of racks, which means that all of the module’s wires will be in the same cluster, avoiding problems of e-matches not stretching far enough to reach the tubes. Figure 6 shows the result of addressing a show without the “Rack Cluster” constraint. Notice the wires coming from a single rail extend to multiple rack clusters.

Figure 6 – Without the “Rack Cluster” constraint, wires from module 01 serve two clusters.
Figure 7 shows the “Rack Cluster” constraint in the addressing dialog, applied to modules. If your firing system has slats, you can apply this constraint at the firing system slats level instead of the module level.

Figure 7 – Adding the “Rack Cluster” constraint to modules will fix the problem.
Figure 8 shows result of addressing the same show with the “Rack Cluster” constraint. Notice that unlike Figure 6, each module in Figure 8 serves only one cluster of two racks. In particular, module 01, which was a problem in Figure 6, serves only the middle cluster in Figure 8.

Figure 8 – With the “Rack Cluster” constraint, each module serves a single cluster.
Adding constraints sometimes increases the number of racks required for the show, because some of the tubes in the racks may need to go unused. When that happens, you will notice the addressing function reports racking errors and automatically selects all the effects that didn’t get racks. At this juncture you can immediately try the menu item, “Racks > Add racks for selected events” to add racks specifically for the effects that need them.
Problem solving
The pin numbers in the tubes, as shown in Figure 8 and other figures, are usually blank for empty or a number for a device of that pin number. The pin numbers are not necessarily unique for each tube. Chains fill multiple tubes with the same pin number to accommodate their multiple devices. Items e-matched together on the same pin also fill multiple tubes with the same pin number.
The rack and pin numbers of the devices are stored in the Rack and Pin columns in the script. Thus, if you clear the Rack and Pin columns in the script window, that would clear all the rack and pin assignments, resulting in a stack of red circles on the right, as in Figure 3. If the Rack and Pin column values contain conflicts or problems, a special symbol may be displayed in the tube. Table 1 gives an explanation.
Table 1 – Pin number problems
| Text in Tube | Description |
|---|---|
| Digit or letter | The pin address of the item that is in the tube. No problem! |
| Blank | The tube is empty. |
| Plus sign (+) | Multiple devices with different pin numbers are assigned to the same tube. Unhide the Rack and Tube columns in the script window. Click the Rack column header to sort by Rack; then shift-click the Tube column header to set the secondary sort criterion to Tube. Scroll down and look for two rows assigned to the same rack and tube. |
| Question mark (?) | The tube is occupied by a device that doesn’t have a pin number. Unhide the Rack and Tube columns in the script window, in addition to the Pin column. Find an item that has a rack and tube value but does not have a pin value. |