In Finale 3D every rack in the show has its own “Rack Number” which is unique. The rack numbers are assigned in order as the racks are created. If you add racks for the entire show with “Racks > Add racks for show” and you like the layout, then you may be perfectly happy with the rack numbers as they were assigned. No need to do anything.
But if you delete or add racks incrementally or if you need to move racks around in the rack layout, then the rack numbers likely won’t remain in a nice looking order from left to right. Do you care? There are two reasons you might:
- If you are printing rack labels and rack layout diagrams to help the crew, then having rack numbers in a sensible order can save the crew time. If you have N racks in the show, then it is also nice if the rack labels show rack numbers that are exactly 1..N, which won’t be the case if there are gaps in the sequence.
- If you have re-arranged the racks in the layout, then you might want the module numbers assigned by the addressing functions to flow from left to right in the layout. The addressing functions consider racks in order of their rack numbers, so if the rack numbers don’t match your layout, then the modules aren’t likely to either.
Not everybody cares about these reasons, so by default the rack numbers aren’t even shown in the rack layout view unless you hover the cursor over a rack. But if you do care, then you can show the rack numbers by clicking the link highlighted in Figure 2, and you can renumber them by selecting all racks or groups of racks and doing “Renumber racks left to right” from the context menu, or by doing “Racks > Renumber all racks consecutively” from the main menu.
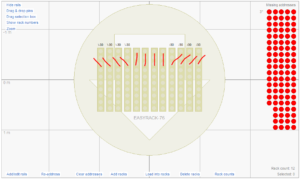
Figure 1 – The default rack layout from “Add racks for show…” may not be organized the way you want.
The default rack layout shown in Figure 1 is typical. If your racks need to be in trident-like assemblies then you might re-arrange the racks from the default layout into angle-up-angle clusters of three as shown in Figure 2, but doing so will arrange the rack numbers helter-skelter, as you can see by clicking “Show/hide rack numbers” in the upper left (circled).
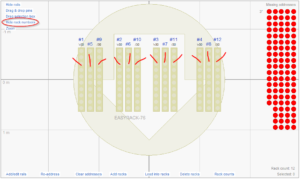
Figure 2 – But if you re-arrange the racks, then the rack numbers are no longer in order left to right.
To fix the rack numbers shown above the racks in Figure 2, select all the racks and right click to get the context menu. The menu item, “Renumber racks left to right” brings up the dialog shown in Figure 3, which renumbers the selected racks in a sequence beginning at a number you specify. If your number sequence overlaps other rack numbers, the existing rack numbers at or above the starting rack number will be increased by enough to resolve the conflicts.
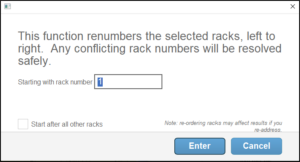
Figure 3 – Renumbering left to right gives you the option of starting the sequence with any number.
Obviously it isn’t the case that all rack layouts are organized left to right, so you may need to select subgroups of racks at a position and renumber them starting at later or earlier rack numbers, repeating the process group by group to get the number sequence you want. You can also edit the rack numbers directly in the racks table at the bottom of the rack layout view, though bear in mind that conflicts are not allowed. If you are editing rack numbers manually you may need to move them to empty number ranges to keep them apart.
The “Renumber racks left to right” context menu function keeps rack numbers within rack clusters together. The example of Figure 2 has rack clusters neatly arranged left to right, but you could imagine if the four clusters were arranged vertically that their racks would be intermingled if globally sorted left to right. To avoid that, the renumber function first sorts the clusters left to right according to their left-most rack, and then within each cluster sorts the racks left to right. The result is: even if you have multiple clusters or rows of racks vertically you can usually select all of them together and do “Renumber racks left to right” once to produce a good outcome.
Introducing gaps in the number sequence is no problem, because once your rack numbers sorted as you want you can then do the main menu item, “Racks > Renumber all racks consecutively”, which compacts the rack numbers down by eliminating the gaps. The main menu function also separates the rack number ranges used by each position so the rack numbers from the first position are 1..X, and the rack numbers in the next position are X+1..Y, and so on up to the last (Nth) rack in the show, whose rack number will be N.
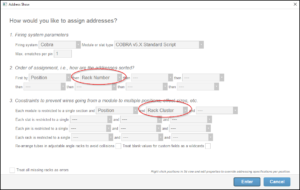
Figure 4 – Address the show sorting by “Rack Number” to assign modules left to right, matching your rack layout.
As described in Addressing based on layout of racks (Rack Number), the addressing dialogs have an assignment order option of “Rack Number”, which makes the modules fill in following the order of the racks in your rack layout. Once you renumber the racks left to right, this sorting option is what generates the address sequence that matches your layout. The result is shown in Figure 5. “Rack Cluster” was added as a module constraint in Figure 4 to prevent modules from spilling over into multiple the rack clusters.
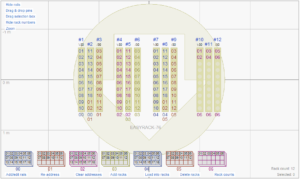
Figure 5 – Great result: module numbers (the numbers just below the racks) progress naturally left to right.