Finale 3D supports both the traditional RJ Equipamentos firing system and the updated timecode based firing system released in 2019. The basic steps to create and export a script for both firing systems are the same. Please follow these steps:
- Address the show (“Addressing > Address show”).
- Export the script (“File > Export > Export firing scripts“).
Step 2 creates the script file, which is a standard format CSV file with a “CSV” extension. The file format details are described in this section, and they differ for the traditional and updated timecode based system.

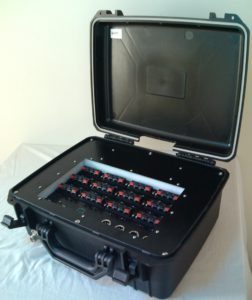
Figure 1 – Traditional RJ Equipamentos module
Additional instructions for the updated timecode based system
The updated timecode based system supports special effects with three special pins, in addition to the standard 16 or 32 pins for pyro ignitions. The steps for designing and exporting a script with pyro and special effects are more complicated than the steps for a pyro-only show:
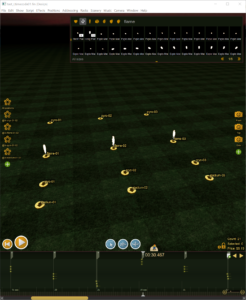
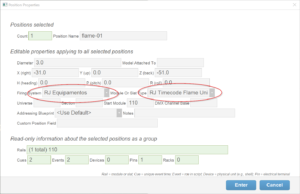
- Layout positions. Layout separate positions for the pyro and each special effect unit, as shown in Figure 2. Each special effect unit position represents a special effect device, like a CO2 jet, or a flame projector, or a stadium shot gun. The pyro position will us pyro pins on one or more modules. Each special effect unit position will use a single special effect pin — F, C, or S — on one specific module. After creating the positions, please select the positions, and right-click on them and do “Edit position properties…” from the right-click context menu. In the position properties dialog shown in Figure 3, select the “Firing system” and “Module type”, matching the type of position. Choose “RJ Timecode 16 Pin” or “RJ Timecode 32 Pin” for the pyro positions, and choose “RJ Timecode Flame Unit” or “RJ Timecode CO2 Unit” or “RJ Timecode Stadium Unit” for the special effect positions.
- Set the “Start Module”. Right-click on each pyro position and assign it a Start Module number for the module used by that position (or the first module if more than one). For example, if you have four positions, you might assign the positions’ Start Module to 10, 20, 30, 40 in order to give each position a range of 10 modules. Next, right-click on each special effect unit position, and assign it a unique Start Module number that is 100 + the Start Module of the pyro position that is triggering the special effect if the special effect unit is a flame projector; or 200 + the Start Module if the special effect is a cryo device; and 300 + the Start Module if the special effect is a stadium shot. Although the script window will show these module numbers as greater than 100, the exported script will record module numbers modulo 100 (subtracting out the 100s). In other words, in the exported script, a module number 101, or 201, or 301 will all be recorded as just 1. Using this technique of adding a 100 or 200 or 300 to the special effect position Start Modules, you are able to separate the pyro address assignments from the special effect units while still defining what module number is actually triggering the special effects (a number less than 100).
- Design the show. Add pyro effects to the pyro positions; flame effects to the flame positions; cryo effects to the cryo positions, and stadium shot effects to the stadium shot positions. At the time of this writing, Finale 3D does not have effects for cryo or stadium shots, so you can just use flame effects as placeholders for those effects. Based on the effect “Type” (see Table 1 of Why is ‘Type’ so important? What depends on it?), most flame effects in Generic Effects have constant duration. Effects with Type = “flame” have constant duration defined in the effect window that the script references; effects with Type = “sfx” have variable duration that you can edit directly in the script. See Flame and special effects with variable duration for instructions. To get started, try inserting the effects GFX1001, GFX1002 if you want constant duration, or insert effects GFX1005, GFX1006, or GFX1007 if you want variable duration that you can edit in the script directly.
- (optional) Create your own flame or special effects.You can search in the effect window or effect palette for “flame” to find all the flames, or you can search for “sfx” to find those with variable duration. In Finale 3D, flame effects (Type = flame) have a constant duration, so if you want flame effects that have a variety of durations as separate effect buttons to click, please create copies of a flame effect and set the durations of the copies as desired. Or, if you would prefer to edit the durations directly in the script, you can use the GFX1005, GFX1006, or GFX1007 effects in Generic Effects, or change the type of any of the other flame effects to “sfx”, which implies variable duration. To change an effect, select the row in the effect window, copy it (control-C), and paste it into your My Effects (control-V after switching to My Effects from the blue selector in the upper right of the effect window). Then edit the “Duration” column to any duration you want, or edit the Type column to change its Type from “flame” to “sfx”. The durations shown in the script window will be recorded in the RJ Equipamentos script file.
- Address the show. Do the menu item, “Addressing > Address show”. Notice that all the special effects in the flame, cryo, and stadium positions will be assigned pin numbers, F, C, and S, instead of numerical pin numbers.
- Export the script. Do the menu item, “File > Export > Export firing scripts“.

Figure 2 – Each special effect unit is its own position.

Figure 3 – The “Module Type” position property specifies whether the position is pyro or a special effect unit.
File format
The traditional and updated timecode based systems have the same basic file characteristics shown in Table 1, and different CSV header rows and information, as shown in Table 3 and Table 4.
Table 1 – File format and encoding
| File format | Extension | Text encoding | Field delimiter | End-of-line |
|---|---|---|---|---|
| Text | .CSV | Code Page 1252 | , (comma) | CRLF |
The script contains rows for the firing events, i.e., unique combinations of module, pin, and ignition-time. Multiple effects can be combined on a single cue. The special characteristics of the script are shown in the following table:
Table 2 – Special characteristics
| Special characteristics | Description |
|---|---|
| Sort order of rows | Rows sorted ascending by event time. |
| What rows represent | Rows represent firing events, i.e., unique module-pin-ignition-time events. If multiple effects are triggered on the same cue, the effect names are combined in comment field, but the row is still just one row. |
| Header | The file contains a single header row with the column names, in the same format as the CSV data rows themselves. |
| Special characters | The characters ‘ and “ and , and ; and \ and tab and newline will be filtered out of any fields. |
| Minimum separation between cues | None required; millisecond resolution supported. |
| Module size options | Modules with 8, 16, and 24 pins are available. |
After the header, each row in the script has a number of fields separated by the vertical bar character. The names of these fields and their descriptions are the following:
Table 3 – Specifications of script fields — traditional firing system
| Field name | Description |
|---|---|
| Cue | The row number in the script, beginning with 1. |
| Shot Time | The event time in milliseconds, padded with zeros to seven digits. For example, 7.152s is represented as 0007152. |
| Burst | The effect time in milliseconds, formatted the same as the Shot Time. |
| Module | The module number (integers beginning with 1). |
| Chanel | The pin number (integers beginning with 1). |
| Comment | Finale 3D writes the effect name in this field, preceded by a count if the row represents more than one device. |
An example script is shown below. Notice the last two rows are at the same event time but have different modules and therefore cannot be combined into a single row.
Cue,Shot Time,Burst,Module,Chanel,Comment
1,0002760,0005000,1,1,Green Chrysanthemum
2,0002860,0005100,2,1,Green Chrysanthemum
3,0002960,0005200,3,1,Green Chrysanthemum
4,0003060,0005300,4,1,Green Chrysanthemum
5,0003160,0005400,5,1,Green Chrysanthemum
6,0003260,0005500,6,1,Green Chrysanthemum
7,0003360,0005600,7,1,Green Chrysanthemum
8,0003460,0005700,8,1,Green Chrysanthemum
9,0003560,0005800,8,2,Green Chrysanthemum
10,0003560,0005800,9,1,Green Chrysanthemum
Figure 4 – Example RJ Equipamentos traditional script
Table 4 – Specifications of script fields — updated timecode firing system
| Field name | Description |
|---|---|
| CUE | The row number in the script, beginning with 1. |
| TIMECODE | The event time in 30 fps frames, formatted HH:MM:SS:FF. |
| MODULO | The module number (integers beginning with 1). |
| CANAL | The pin number (integers beginning with 1); or F, C, or S for the three special effects pins. |
| ABERTURA | Blank for pyro channels; the duration in milliseconds for the special effect channels. The exported duration depends on the “Type” field of the effect. If the effect’s Type is flame, other_effect, or not_an_effect, then the exported duration is the value in the effect’s “Duration” field in the script, converted to milliseconds. If the effect Type is anything else, the exported duration is 500. If the effect’s Type is other_effect or not_an_effect, then you can edit the Duration field directly in the script window. If the effect’s Type is flame, then the Duration field in the script window is a reference to the Duration field of Per-show effects in the effect window (use the blue selector in the upper right to select the Per-show effects). These differences between effect types are explained here: Why is ‘Type’ so important? What depends on it?. |
An example script is shown below. Notice the last two rows are at the same event time but have different modules and therefore cannot be combined into a single row.
CUE,TIMECODE,MODULO,CANAL,ABERTURA
1,00:00:10:00,10,1,
2,00:00:10:03,20,1,
3,00:00:10:06,30,1,
4,00:00:15:00,10,F,110
5,00:00:15:00,20,F,110
6,00:00:15:00,30,F,110
7,00:00:20:00,10,C,410
8,00:00:20:00,20,C,410
9,00:00:20:00,30,C,410
10,00:00:25:00,10,S,410
11,00:00:25:02,20,S,410
12,00:00:25:03,30,S,410
13,00:00:30:10,10,F,110
14,00:00:30:10,20,F,110
15,00:00:30:10,30,F,110
16,00:00:35:10,10,C,410
17,00:00:35:10,20,C,410
18,00:00:35:10,30,C,410
19,00:00:40:10,10,S,410
20,00:00:40:11,20,S,410
21,00:00:40:13,30,S,410
Figure 5 – Example RJ Equipamentos updated timecode script
Table 5 – Example files
| Download link | Explanation |
| test_rjequipamentos.csv | Example exported file (CSV) |
| test_rjequipamentos.fin | Example show file |
| test_rjtimecode01.csv | Exported timecode show with special effects |
| test_rjtimecode01.fin | Example timecode show with special effects |