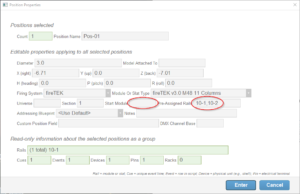
The “Start Module” and “Pre-Assigned Rails” fields of position properties are two ways of specifying the firing system equipment for the position. For any position, you can use one field or the other, but not both at the same time since they would conflict with each other. Here are two ways to access the properties for positions.
-
- To view position properties in a dialog, right click on a position in the design window and select “Edit position properties”
- To view position properties in a table, go to the Window menu and select “Positions window”
The Start Module and Pre-Assigned Rails fields have slightly different purposes.
-
- The Start Module field specifies what module number the addressing functions should start counting from when assigning modules to an addressing group of positions.
- The Pre-Assigned Rails field is a comma separated list of rail addresses that specify a specific set of firing system rails that an addressing group of positions can use. The order of addresses in the list does not matter; they will always be considered in sorted order.
For firing systems that do NOT have slats, the words “module” and “rail” are synonymous. For example, the word module means the same thing as rail for Cobra and FireOne. For firing systems that do have slats, such as fireTEK, the “module” refers to the piece of hardware that has four twelve-pin “slats” connected to it. For systems like fireTEK that have slats, the “rail address” is the module-and-slat number. Here are a few examples using different firing systems.
Cobra
-
- To allocate a Cobra 72M to a position, enter four rail (i.e., module) numbers in the Pre-Assigned Rails field, such as 5,6,7,8
FireOne
-
- To allocate a single FireOne module to a position, enter the rail (i.e., module) number in the Pre-Assigned Rails field, such as 10
fireTEK
-
- To allocate a fireTEK slat to a position, enter the rail-slat numbers in the Pre-Assigned Rails field, such as 11-1, or 11-2, or 11-3, or 11-4 (to identify a specific slat on module 11)

Figure 1 – The Start Module and Pre-Assigned Rails fields are two ways of specifying the firing system equipment for the position.
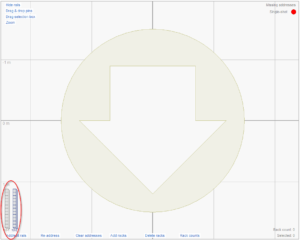
In the Pro version of Finale 3D, one other difference between Start Module and Pre-Assigned Rails is that Pre-Assigned Rails will show up in the rack layout window for a position even before addresses have been assigned. Compare the Pre-Assigned Rails field of Figure 1 with the graphical depiction of the slats in the lower left of Figure 2. There aren’t any assigned addresses yet (no pin numbers in the slats), but the slats are still there. If the position used the Start Module field (specifying 10, say), instead of using the Pre-Assigned Rails field, then there would be no slats drawn in the lower left of Figure 2 until addresses were assigned. At that point, whatever slats were used by the addresses would show up.
It is easy to guess why Start Module doesn’t cause modules or slats to appear in the image before addresses are assigned — the software wouldn’t know how many are required!

Figure 2 – The Start Module and Pre-Assigned Rails fields are two ways of specifying the firing system equipment for the position.
Addressing groups
The addressing functions assign firing system addresses to events at positions by sorting the events as specified by the user, and then working their way through the sorted list, assigning the next available rail and pin number to each event. The Start Module and Pre-Assigned Rails complicate this algorithm by affecting what the “next available rail” is for positions that specify them, creating a problem: the algorithm needs a single definition of “next available rail” for its assignment, but the definition of “next available rail” can be different for different positions.
To solve the problem, the addressing functions divide the full set of positions into separate addressing groups, each group having positions with the same Start Module and Pre-Assigned Rails. The functions assign addresses for the groups one after another, starting each group with the next module number after the largest module number assigned in the previous group and adjusting the “next available rail” by the Start Module and Pre-Assigned Rails for the group.
If the Start Module and Pre-Assigned Rails are different and non-overlapping for all positions, then all you need to know about addressing groups is that different Start Module and Pre-Assigned Rails split positions into different groups. If the Start Module or Pre-Assigned Rails are the same or overlapping across multiple positions, extra care is required to avoid addressing collisions. The care is explained here: Addressing groups.
