Every firing system on Earth that uses numerical module numbers begins with module number zero or one. When you assign firing system addresses using Finale 3D, the module numbers naturally will begin by default with the firing system’s starting module number. You can change that, however, if you have reason to.
If your firing system starts with module number zero and you would prefer to start with module number one, you can change that in Finale 3D by making a custom module specification for the firing system, and addressing the show with your custom module specification. The menu item, “Addressing > Addressing settings > Set custom module specification…” is the first step.

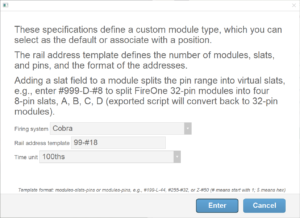
Figure 1 – The pound sign indicates the numbers will start counting at one.
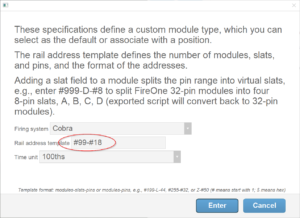
The “Rail Address Template” field of the custom module specification dialog specifies the address format for the custom module. For a simple firing system address scheme like Cobra, the Rail Address Template field has two components, indicating the format of the module and the pin. The pound sign indicates the numbers start counting at one. If there’s no pound sign, then the numbers start counting at zero. So you can see with the default Rail Address Template for Cobra in Figure 1, the modules start counting at zero (no pound sign), and the pins start counting at one (pound sign). If you want the module numbers to start counting at one, just add a pound sign in front, as in Figure 2.

Figure 2 – Add a pound sign to the module number format to make the Cobra module numbers start counting at one.
If you want the module numbers to start with some other number, then you can set the “Start Module” number of the launch positions by right clicking on the positions and doing “Edit position properties…” from the context menu, or opening the “Positions” window from the “Window” menu and editing the Start Module fields in the table for any or all of the positions.
If you set all the positions’ Start Module numbers to the same number, then the addressing functions will operate uniformly except beginning with your chosen Start Module number. If you set different Start Module numbers for different positions, then the addressing functions will assign module numbers counting upward from the each unique Start Module number. It is imperative that these sequences of module numbers don’t overlap. If you assign the Start Module number 10, for example, to some positions, and 15 to other positions, then make sure that all the shots at the positions with Start Module number 10 can be accommodated by 5 modules, so the sequence of module numbers beginning at 10 doesn’t overlap the sequence beginning at 15. You will get addressing errors in the addressing function if the sequences do overlap. For more instructions, see Specifying module numbers for each position
A third option for assigning addresses beginning at arbitrary start numbers is to assign firing system addresses by selecting rows and filling down, using the fill down technique described in, Addressing basic instructions.