“Addressing” is the process of assigning firing system module and pin numbers to the events in the show. Addressing is one of the three basic steps involved in designing a show and creating a firing system script:
- Design the show
- Address the show
- Export script
You can’t really export a firing system script without doing Step 2, because the script wouldn’t contain any module and pin number instructions for the firing system to fire. You can see why in the script table window. The “Rail” and “Pin” columns contain the module number and pin number assigned to each row in the script. Prior to addressing the show, the Rail and Pin columns are blank. When you address the show, you fill in the values for these columns. In Step 3, when you export the firing system script, it is the values in the script table that make up the firing system script.
For most firing systems, the term Rail in Finale 3D means exactly the same things as “Module“. The only difference between the two terms is for firing systems that have slat numbers or letters in the addresses. In those cases, Rail includes both the module and the slat parts of the address, together (example: 50-A, not just 50); whereas Module is just the module number part of the address (example: 50).
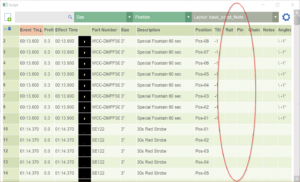
Figure 1 – Before addressing the show, the Rail and Pin columns are empty.
The rows in the script are called “Events.” They correspond to the horizontal bars on the timeline, and to the effects in the show. From the blue gear menu in the upper right of the script window, you can collapse rows into a single row for the entire chain, or one row for each shell. The script table contains about 40 columns of information, most of which are hidden by default so the table is easier to read. A few of the hidden columns, though, are also set by addressing process, in addition to the Rail and Pin.
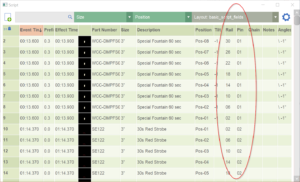
Figure 2 – After addressing the show, the Rail and Pin columns specify the module, slat, and pin addresses.
You can unhide columns in the script from the blue gear menu in the upper right. The additional columns that the addressing process sets are: Module Or Slat Type, Rack, and Tube. It is not necessary to know much about these fields for the basic addressing instructions, but it is good to know they exist. You might wonder, “When I export the script, how does the software know what addressing system the script is for?” (answer: the Module Or Slat Type field in the script determines the firing system); or “How do I fill in the little rack tube numbers in the rack layout window?” (answer: the addressing functions fill in the rack assignments in the Rack and Tube fields if you have added racks before addressing the show. See Rack layout).
Addressing methods
Finale 3D supports a variety of methods of assigning firing system addresses. The three main methods are:
- Address the entire show at once (“Addressing > Address show…“)
- Address the show using blueprints (“Addressing > Address show using blueprints assigned to positions“)
- Address the show manually by typing in numbers and filling down (“Addressing > Fill down addresses in script window…“)
Addressing the entire show at once is the easiest and most common addressing method. Simply do the menu item, “Addressing > Address show…“. An addressing dialog appears with selectors for you to specify the firing system, the maximum number of e-matches that can be connected to a single pin (E-match limit), the sort order in which the addresses are assigned (usually people sort first by position, then either by size or angle or event time or part number; see Sorts), and the constraints that prevent e-matches from stretching between positions or between racks that are too far apart (see Constraints). Additionally, the method of addressing the entire show takes into account any of the position properties that you may have specified by right-clicking on the positions and selecting “Edit position properties” from the context menu. The position properties enable you to specify the module numbers at each position (Specifying module numbers) and to divide the show up into sections of positions that can share modules or slats (Sharing modules and Sections), and even to divide the show up into universes of positions that use different firing systems altogether! (Multiple firing systems)
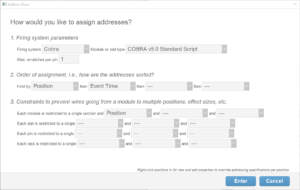
Figure 3 – The “Addressing > Address show…” dialog
Addressing the show using blueprints is for circumstances in which different sections of the show require different rule sets. For example, a show may have a front line of positions that share slats and for which modules can serve any of the effect sizes at the positions (because the effects are all small and they are in single-shot racks that are not limited to single sizes, for example); yet the show may also have shell positions farther back in the field that do not share slats from the same module and for which it is most efficient to limit modules to serving only a single size shell per module, even if the position houses multiple shell sizes. Circumstances like this require a different configuration of addressing settings per section of the show. Imagine if you could have a separate addressing dialog of Figure 3 for each section the show. That is essentially what “Addressing Blueprints” are. You create an addressing blueprints from “Addressing > Create addressing blueprint…” and you allocate different blueprints to different positions by right clicking on the positions and setting the Addressing Blueprint field of every position. After assigning every position’s addressing blueprint, you do “Addressing > Address show using blueprints assigned to positions…” to address the show using the blueprints you have set up.
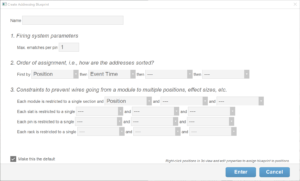
Figure 4 – The “Addressing > Create addressing blueprint” dialog
Addressing the show manually by typing in numbers and filling down is a manual approach to addressing that gives you the ultimate control over the addresses, because you can set them to anything you want. The basic idea behind this approach is that you (a) sort the script table window by clicking on the column headers (shift-click to add multiple sort criteria, e.g., sorting by Position first, then by Size), then (b) select a range of rows that could be anything from a single row to the entire show, then (c) do “Addressing > Fill down addresses in the script window…” to assign an incrementing sequence of addresses to the selected range of rows. The sequence of addresses can automatically skip to the next module or slat based on conditions you declare in the dialog that pops up. You also have control over whether the sequence is allowed to re-use pins assigned earlier for effects that could be combined on the same pin. Please check the “Backfilling allowed” box in the lower left of the dialog shown in Figure 5 to enable re-using pins. This method of addressing is used mainly for tricky situations in which your criteria for addressing choices are difficult to spell out. It is also used by designers who grew up addressing shows by the fill down method and who prefer the table-based user interface. The drawback to this method is that if you make any changes to the show, you need to repeat your manual addressing procedure. There is also the possibility of making addressing errors since it is a manual process, although the Finale 3D software does include troubleshooting functions in the “Addressing > Troubleshooting” menu to verify your show doesn’t have any conflicts, which can provide some extra confidence.
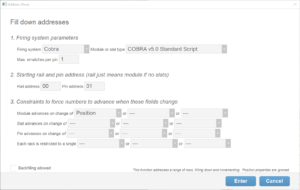
Figure 5 – The “Addressing > Fill down addresses in script window” dialog