You can use background images to make a convincing but fake 3D scene by arranging the launch positions to look like the fireworks are coming from the buildings or other structures in the image. The technique is called trompe l’oeil, and it is often the easiest way to create a simulation video with minimal effort. Full instructions are here: Background images.
Static videos taken from a single point of view, though, look dead in comparison to videos taken from multiple points of view or from a flying drone. It actually doesn’t take much camera motion to make the video feel alive. It just takes some. The difference is striking if you compare a video with no camera motion to a video with even the smallest amount of camera motion. Once you see the difference, you’ll never make a fully static video again.
Unless you need to make a trompe l’oeil video! In that case you may be wondering: is it even possible to add camera motion to a trompe l’oeil video? The answer is yes, within parameters. This section explains the technique, step by step. Spending a half hour adding camera motion can be the difference between a video that looks dead or alive.
“Yes, within parameters”
Trompe l’oeil videos rely on arranging the positions to align with the background image to make it look like the fireworks are coming from structures in the image. From a single point of view, it is possible to arrange the positions the proper distances from the camera, to create the correct foreshortening, and to align the positions with perfect registration on the structures in the image. If you get the positions to line up perfectly, it is almost impossible to tell the 3D the scene is faked. But that is for a single point of view. Camera motion changes the point of view, which causes the positions to fall out of alignment with the background image.
Not all camera motion is the same, though. Moving the camera forward or back is bad news. That breaks the illusion immediately because it affects the view of the positions a great deal but only slightly affects the background image, making the positions fall out of registration with the background image immediately. Moving the camera up into the sky also breaks the illusion, but there is one camera motion that affects the view of the positions and the background image in approximately the same degree: rotating the camera left/right.
Figure 1 – Beginning frame shows left end of the bridge in the background image.
Figure 1 and Figure 2 show the beginning and ending frame of a trompe l’oeil video of a fireworks show on a bridge. The bridge is in the background image itself. The fireworks spring from positions laid out to look like they are on the bridge. Notice that in both of these images, the fireworks align pretty well with the bridge. The camera angle in the second image has been rotating more than 90 degrees!
Figure 2 – Ending frame shows right end of the bridge in the background image.
In a nutshell, the technique for adding camera motion to trompe l’oeil videos is 1) setup your background image, 2) layout your positions to be at the proper distances and to align with the image, 3) create one camera key frame at the start of the show and a second camera key frame at the end of the show by orbiting the camera around by 90 degrees or so, or whatever looks good. The end result is a slow, continuous glide of the camera over the entire show. You aren’t looking to attract attention with the camera movement. You just want the video to look alive. A link to the show file used in this example and a movie are at the end of this section. Take a look at the file or the movie to see the end result!
Figure 3 – Original image used for the video.
Figure 3 shows the modest beginnings of this example show. This is the picture that is imported as a background image. Figure 4 shows the complete set of sky image adjustments that transforms the image of Figure 3 into the nighttime image that you see in the video. The remaining paragraphs in this section walk through the steps of the technique, one by one, so you can see the significance of each sky image adjustment.
Figure 4 – Stretching the image horizontally — even by a 100% or more — doesn’t look bad (amazingly).
Nine step technique
The first step of the technique to add camera motion to trompe l’oeil videos is to import the background image and take a look. You might see something like Figure 5, which clearly needs some adjustment. Before adjusting the background image parameters or aligning positions, please make sure to turn on “Standard aspect ratio in edit mode (letterbox)” in the “File > Render settings…” dialog. That will guarantee that what you are looking at when making adjustments is the same as what will appear in the video. Without this setting, what you are looking at when editing would depend on the dimensions of the window, which usually aren’t the same as the video dimensions.
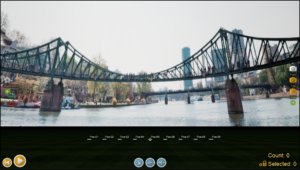
Figure 5 – Preparation step #1: Import the background picture at default FOV (e.g., 120 degrees). See how it looks.
The camera field of view parameter controls the fishbowl aspect of the image projection. If the image hasn’t been cropped, then matching the field of view of the camera that took the picture will result in the proper projection. That may not help you, though, if you don’t know the field of view your camera. Most cell phone cameras have field of views of about 60 or 70 degrees. You don’t need to get it exactly right. Just try a few numbers until it looks good.
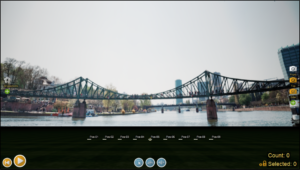
Figure 6 – Preparation step #2: Adjust FOV to make it look right (in this case 70 degrees since the original image had been cropped).
Figure 6 shows the image after fixing the field of view. At this point, you are all set for making a video with a single point of view. To add left/right camera rotation, though, you’ll need a wider panorama. In fact, to rotate the camera 90 degrees and still to have room for blending the edges to black you’ll need a significantly wider panorama! Since the original image only captures the view ahead of the camera (not to the sides), it is hard to imagine where a wider panorama would come from.
In French, “trompe l’oeil ” means “trick the eye”. While it may seem brazen, you can trick the eye by simply stretching the image horizontally to enlarge the panorama. Doing so will of course stretch everything in the image horizontally also, widening the buildings and bridges or anything else. Surprisingly, though, stretching things horizontally, even by a large amount like 100% or 200%, actually isn’t very noticeable unless you are looking at the two images side by side. So you can get away with it!
Use the “Stretch horizontal” parameter in the dialog of Figure 4 to see how wide you stretch your image without it looking wrong. Figure 7 shows last image stretched 100% (2X the original width), and it doesn’t look bad. In this dialog, the value 0 means no stretching, i.e., normal. The value 100 means stretched 100%, i.e., twice as wide. You stretch by as much as 200% (three times as wide).
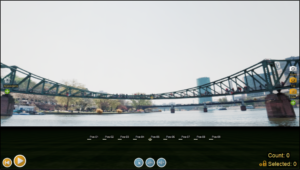
Figure 7 – Preparation step #3: Stretch horizontally as much as you can get away with (100% in this case), to increase the width of panorama and make room for camera motion.
The dialog of Figure 4 also has parameters to darken the sides and top and bottom of the image, as described in Background images. With a wider panorama, you have more room on the edges to fade to black gradually. Figure 8 shows the result.
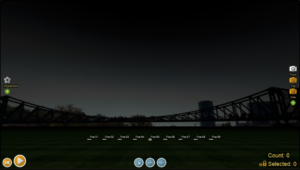
Figure 8 – Preparation step #4: Set darkening parameters (see parameters in Figure 4).
The parameters of Figure 4 also shift the picture down to align the horizon in the simulated view with the horizon in the image. That sets you up for changing the grass to reflective water by “Scenery > Landscape and water > Add water everywhere”. Alternatively you could turn the ground off with the checkbox at the bottom of the dialog, which would let the original water of the image show through, but obviously that water isn’t animated and doesn’t reflect the fireworks.
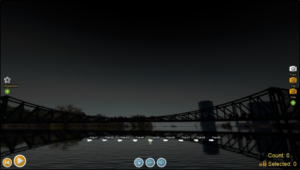
Figure 9 – Preparation step #5: Do “Scenery > Landscape and water > Add water everywhere” if the scene is over water.
At this point, your background image is ready for making a video with camera motion. The next step is to align the launch positions with the background image. As a reminder, before working to align the positions, please turn on “File > Render settings > Use standard aspect ratio (letterbox)” to make your editing view reflect what will be shown in the video.
To get the proper foreshortening of fireworks in the distance, you need to move the launch positions back into the scene to the approximate distance from the camera that they would be if the scene had 3D models for the structures. In this example, the bridge seems to be about 300m away from the camera point of view, so just go into top view and slide the positions back about that far. Also stretch the line out (“Positions > Arrange positions > Into line”) to separate the positions from each other by the proper distances (total distance of 800m in this case).
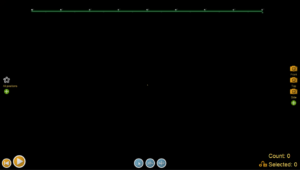
Figure 10 – Preparation step #6: Switch to top view, and move the positions back to the distance of the bridge (about 300m in this case), and stretch the width of the line of positions to be the correct width (in this case about 800m total).
Having moved the positions back into the scene, return to the front view and drag the positions up vertically to match the background image, as shown in Figure 11.
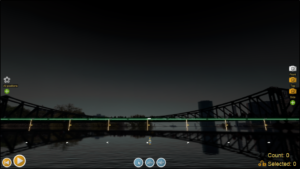
Figure 11 – Preparation step #7: Back in front view, drag the positions up vertically to align then with the base of the bridge.
Once the positions are at the proper distance from the camera and align with background image, click on the blue “orbit” control at the bottom of the design view and drag the scene left/right to rotate it. Get a sense for how far you can rotate it without the positions falling out of alignment from the background image. You don’t need much. Remember that the purpose of the camera motion is just to make the video seem alive. Figure 12 shows the starting point for camera motion in this example.
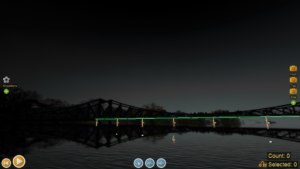
Figure 12 – Preparation step #8: Aim the camera to the beginning point of view, and create a camera key frame at the beginning of the show.
Figure 13 shows the ending camera view. Add a camera key frame at the beginning of the show for the beginning point of view, and at the end of the show for the ending point of view. The camera will glide peacefully from one view to the other over the course of the show, achieving the desired result.
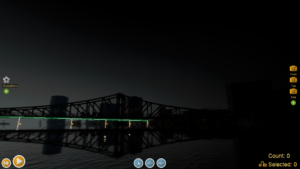
Figure 13 – Preparation step #9: Aim the camera to the ending point of view, and create another camera key frame at the end of the show.
Table 1 – Example files
| Download link | Explanation |
| test_bridge_model.fin | Example show |
| test_bridge_model_player_compatible.mp4 | Player-compatible MP4 video |
| Browser-compatible MP4 video |