Sky dome images are background images in the 3D scene that depict what you see at the farthest distance. Everything in the simulation will appear in front of the sky dome image, either a default image or one you’ve chosen. You can also use a “backdrop” background image with transparency to depict nearer objects in the scene like buildings, and you can position fireworks in front of the backdrop image or between the backdrop image and the sky dome in the distance.
If you have a day time photograph of the shoot site, you can import it as a sky dome image in Finale 3D and apply darkening gradients to make it look like night. By arranging the launch positions, you can make it look like the fireworks are coming from the buildings or other structures in the background image. The technique is called trompe l’oeil, and it is often the easiest way to create a simulation video with minimal effort.
You can also import a background image of the terrain if you have an aerial image or a screen shot from Google Earth. In fact to make it easy, Finale 3D has a feature to import Google Map satellite imagery directly from Google. For large shoot sites, the size of the ground image can be an issue. If your shoot site area is 10 km by 10 km, for example, and if you want a resolution of one pixel per square meter, that would be 100,000,000 pixels, which is probably too large for your computer to handle. When Finale 3D imports a background image of the ground, it gives you the option of downsampling the resolution in the distance to keep the resolution higher in the center of the shoot site, which would figure prominently in your simulation video, while lower in the distance where it doesn’t matter as much.
Importing a sky dome
In Finale 3D, the word “sky dome” means an image projected onto a backdrop in the shape of a dome covering everything you see, like the inside surface of a snow globe with you inside. When you import a sky dome image, the dimensions of the photograph and the field of view of the original camera that took the photograph determine the height and wrap around width of the projection of the photograph on the dome. As shown in Figure 1, the “Set sky dome image adjustments” dialog that is in the “Background images” menu and presented when you import a sky dome image includes an input field to specify the field of view. Most cameras have a field of view of about 70 degrees. Try that and adjust if the image looks skewed.
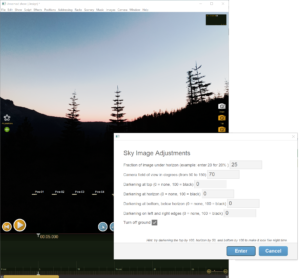
Figure 1 – The Sky Dome Image Adjustments dialog adjusts the field of view, horizon, and darkening.
The dialog also includes an input field to specify the horizon height in the image. The horizon height adjusts the projection of the image up and down vertically on the inside surface of the dome. You should set the horizon field such that the horizon in the image is just above the plane of the ground in the 3D view. Backdrop photographs of buildings and landscapes typically have a horizon about 25% up from the bottom of the photography. The photograph shown in Figure 1 is an exception. As you can see, its horizon is nearly 50% of the way up (although it is a little hard to tell where the true horizon is since the hills are blocking a view of the distance). When you import a sky dome image photograph, whether it is a building or landscape or anything else, the first two adjustments to get right are the field of view and the horizon height.
Darkening the edges
The optional darkening fields in the Sky Dome Image Adjustments dialog apply gradients to the top, bottom, and edges in order to make the image look like night time and to make the edges blend smoothly to black. Figure 2 shows the result of setting the horizon to 45% and the darkening fields to 100, 50, 100, and 25. The picturesque night time image of Figure 2 is the same photograph as in Figure 1, with these adjustments applied.
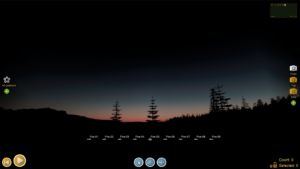
Figure 2 – The darkening parameters can make a day time image look like night.
The specific settings for the night time image in Figure 2 are shown in Figure 3. Notice the bottom setting, “Turn off ground”, is checked. That setting turns off the ground image, making the ground transparent so the bottom of the photograph, below the horizon line, will show through.
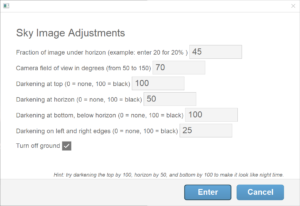
Figure 3 – Example of darkening settings that look good.
Turning off ground is the way to go if you are creating a simulation video that is mainly front view and if the imported photograph looks good by itself, but there are a few circumstances in which you may want to leave ground turned on. You can turn on the simulated, reflective water, for example, with the menu item “Scenery > Landscape and water > Set to water everywhere”. The combination of simulated water and an imported sky dome image photograph makes for an extremely believable scene as shown in Figure 4 — especially when you see the reflections of the fireworks in the water!
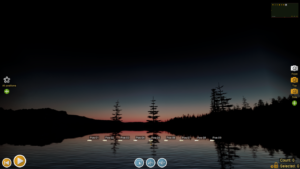
Figure 4 – Combining a sky image with simulated water is stunning!
Another circumstance for turning on ground is if you have an imported ground image or if you select ground imagery from Google Maps using “Scenery > Background images > Set background image to Google Map…” If you are making a video from the front view, then the sky dome image is usually the center of attention, and the ground is either turned off or is set to water. If you are making a video from more of a top down, aerial point of view, such as if shot from a drone, then the ground image is usually the center of attention, and the ground is turned on. In that case, the sky dome image is often just a distant sky line or a generic backdrop.
Trompe l’oeil
By arranging the launch positions, you can make it look like the fireworks are coming from the buildings or other structures in the background image. Take for example the photograph shown in Figure 5. After importing this photograph as a sky dome image, setting the ground to water everywhere, and arranging launch positions so they look like they are on the bridge, you can generate a simulated scene like that of Figure 6.
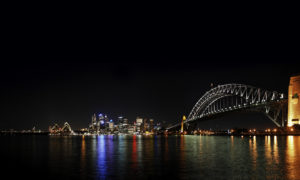
Figure 5 – The trompe l’oeil technique can make it look like fireworks are coming from the bridge in this photograph.
Of course, the launch positions aren’t actually on the bridge. They can’t be, because the bridge is just a projected image in the background, but they can appear to be on the bridge if you align them perfectly for a particular point of view.
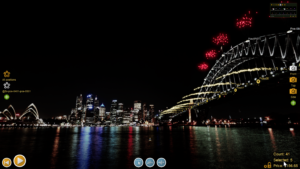
Figure 6 – After importing the photograph as a sky dome image and arranging the positions, the scene is ready for fireworks.
The positions in Figure 6 are arranged to look like they are on the bridge. In fact, in this example the positions on the lower section of the bridge are oriented facing out (notice the yellow circles are seemingly facing outward, away from the side of the bridge), and the positions on the upper truss shooting red mines are oriented facing up. In both cases the actual coordinates of the positions are somewhat realistic. Those positions farther away on the bridge are actually farther away in the 3D view, which makes the fireworks from them foreshortened realistically.
For images like the front of a building in which all the positions are about the same distance away from the viewer, you don’t need to try very hard to get the positions to align with the building. All you need to do is click the yellow padlock in the lower right to unlock the positions, and then while viewing from the desired point of view drag the positions to the right spot relative to the picture. That’s it. You could even do the same for the Sydney Bridge example of Figure 6, but the simulation would be a little less accurate because the positions at the distant end of the bridge should be farther away from the viewer in order that the fireworks appear smaller.
The trompe l’oeil technique only works for a particular point of view and aspect ratio. If you arrange the positions to align perfectly with the image, and then subsequently rotate or move the point of view even slightly or resize the window, all the positions will shift against the image and will no longer be in the correct spots. Thus even before arranging the positions you’ll need to follow a few steps:
- In the “File > Render settings…” dialog, set the screen to the standard aspect ratio (letterbox mode). This mode will always render the screen in a 16:9 aspect ratio, which is the same aspect ratio as the simulation videos.
- Choose your point of view and create a camera shortcut for it (unless you are using the “front’ camera shortcut which exists by default). To create your own camera shortcut, orient the point of view with the blue navigation buttons at the bottom of the screen, and then click on the green plus sign on the right side of the screen. That creates the new camera icon. Then click on the name of the new camera icon, and rename it to whatever you want.
- Drag the positions so they align with the image. Right clicking positions and selecting “Move on axis” from the context menu is a good way to fine tune the coordinates by dragging three colored arrows pointing along the axes in the positions’ orientation. The “Rotate” options in the context menu are a good way to adjust the orientations.
For reference, step 1 of this process involves the checkbox at the bottom of the “File > Render settings…” dialog, as shown in Figure 7. These three steps are all that is required to make a simulation video with fireworks appearing to come from objects in a background image.
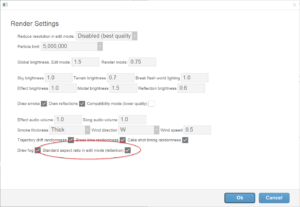
Figure 7 – The “File > Render settings…” dialog
Ground images
Google maps and imported ground images are simpler than the sky dome images if you aren’t trying to do trompe l’oeil because there’s nothing to align and there aren’t any visual adjustments other than possibly adjusting the brightness of the terrain in the “File > Render settings…” dialog. The only settings required for importing a ground image are shown in Figure 8, which is presented after importing an image from “Scenery > Background images > Set ground image > Add image…”
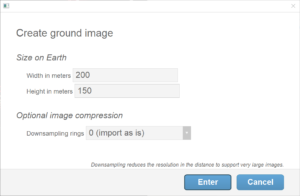
Figure 8 – The settings for importing ground images
The width and height fields in the ground image settings will determine the size of the image on the ground. You can type the dimensions in feet in this dialog if you prefer, by adding “ft” or single-quote after the number to indicate the unit of measure is feet instead of meters. The downsampling rings reduce the resolution in the distance to compress the image so it doesn’t use as much memory on your computer. A very large image might use too much memory and cause your computer to crash. If your image is larger than 2000 pixels wide, you may need to use downsampling, depending on your computer’s specifications. For very large images, like 8000 pixels by 8000 pixels, you will definitely need downsampling.
Table 1 – Example files
| Download link | Explanation |
| trompe-l-oeil-sydney-bridge.fin | Example show |