Background images are imported photographs projected onto a backdrop or curved “sky dome” surface or ground plane in the simulation to give the illusion that the contents of the photograph are part of the 3D scene itself. The sky dome and ground images are explained in Sky dome, trompe l’oeil, and ground images; this section discusses the backdrop images, which are the easiest and most versatile kind of background image, and which are available in all versions of Finale 3D.
Backdrop images
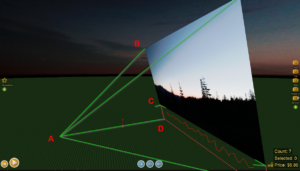
The diagram in Figure 1 shows how backdrop images work. Backdrop images are so convincing that you have to look at them from the side view to understand what is going on. The standard “Front” view in Finale 3D positions the camera, or point of view, at location (A) in the figure, aiming in the direction of the backdrop image like a giant drive-in movie theater.
The point of view at location (A) is about 10 meters off the ground, aiming slightly upward from horizontal. If the point of view were aiming strictly horizontal, then the horizon in the scene would be exactly half way up the projected scene. That may be right for some scenes, but typical outdoor pyrotechnics photography shows more sky than ground, to leave room to the fireworks.
The backdrop image is generally imported perpendicular to the point of view (which is slightly upward from horizontal), meaning that the backdrop image leans forward slightly forward, as you can see in Figure 1. For most realistic results, the horizon in the photograph should align with the horizon in the simulation. The horizon in the photograph can be anything, depending on what the photographer chose. In the Figure 1 example, a nearby mountain range comprises about half of the image but the true horizon is only the bottom 20% or so of the photograph. The photograph height extends from (B) to (D), but the region from (C) to (D) is set below the ground when the image is imported.
The ground rendering in Figure 1 is turned ON, with the grass texture. It therefore occludes, or clips off, the bottom 20% of the sunken backdrop image photograph in the figure. The import dialog has an option to turn the ground rendering OFF, and OFF is the standard setting so the full background image can be seen in the simulation, including the below ground area between (C) and (D) that is not visible in Figure 1. The fireworks launching from the ground in the simulation would launch on an invisible ground plane that intersects (C), and the bottom edge of the photograph visible in Figure 1, and the ground point just under (A).

Figure 1 – The backdrop image is like a giant drive-in movie theater, shown here from the side.
Backdrop image adjustments
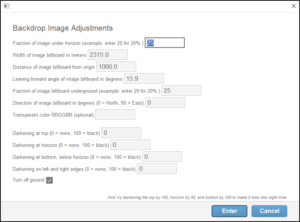
When you import a backdrop image, the dialog of Figure 2 comes up with the numerical fields pre-calculated based on the dimensions of the photograph. You can recognize the first field, “Fraction of image below horizon” as the proportion of C-D to B-D in Figure 1. This numerical field you may need to adjust for your image, because Finale 3D cannot discern where the horizon is in the image as well as you can. The next four fields, including “Fraction of image billboard that is underground”, are calculated precisely such that the image fills the field of view in the standard “Front” view. Since the image proportions may not match the view screen proportions, the projected image may extend beyond the view in either the horizontal or the vertical dimension.
The last of these four numerical fields, “Fraction of image billboard that is underground”, sounds a lot like the first field but is subtly different. The figure “Fraction of image below horizon” is intrinsic to the photograph itself; it does not depend on Finale 3D or backdrop image settings or anything else. You can just look at the image and determine what the number should be.
By contrast, “Fraction of image billboard that is underground” designates how deeply the backdrop itself will be sunken into the ground in the 3D scene. For backdrop images that represent scenery in the far distance, you should set the underground fraction to be the same as the below horizon fraction, because they match up in the photograph. However, for backdrop images that represent nearer objects in the scene you may choose to use other values. For example, if you have an image of a building or wall, you probably want the exact base of the building or wall to align with the ground plane in the simulation, even though the horizon may be substantially higher than the base of the building or wall in the photograph.
The last numerical field, “Direction of image billboard in degrees”, rotates the image billboard position around the origin counter-clockwise by the given degrees. By default this field is zero, but you may need to set it to align an image with Google maps or for some other reason.

Figure 2 – The numerical fields fill in automatically based on the dimensions of the photograph.
Transparent color
The transparent color field is useful when you want a simulation that includes effects both in front of and behind the backdrop image. For example, if you were making a simulation of the Disney castle, you may want some fireworks appearing in front of the castle, and others in back. The transparent color field gives you a way to do that with an imported backdrop image.
The field is simply an RGB color in the format RRGGBB where RR, GG, and BB are two hexadecimal digits from 00 to FF. When importing the image, Finale 3D will replace this specific color with transparency. Thus, for something like the Disney castle, you would need to prepare your photograph by filling in the area behind the castle with an RGB color that is not used in the castle itself, and then import that picture while indicating the RGB color that is to be considered transparent.
Darkening
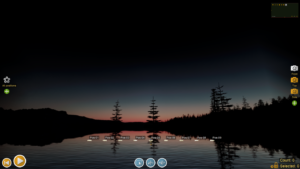
The darkening fields provide a quick way to convert a daytime photograph to an evening or night time scene by applying darkening gradients on the edges and at the horizon. A little bit of experimentation with these numbers pays off. Applying the right gradients can produce a remarkably realistic transformation, as you can see in Figure 3, which is the same photograph as Figure 1 but with darkening applied and with the ground plane set to reflective water.

Figure 3 – Example of darkening settings that look good.