Some applications may require combining a simulation video produced in Finale 3D with other video created in other applications. Video editing software tools like Adobe Premiere provide all the functionality to combine videos, but you still need to create the video assets in a suitable format to be combined.
There is a common misconception that overlaying fireworks simulations from Finale 3D onto other video backgrounds would require a transparency layer (also called an alpha channel, or chroma key) to extract out the simulations to apply over the background. However, fireworks simulations are predominantly light, so alpha blending is not the best operation for combining them onto background scenery. The reason is, light should never darken a scene, but if you use alpha blending, the partially transparent edges of the sparks may actually be darker than the background or even nearly black. Therefore even if they are mostly transparent, they actually darken the scene. The result is black edges around sparks.
A better operation to combine a fireworks simulation over a background is called “additive blend” or “linear dodge”. This operation strictly adds the light from the fireworks simulation to the background. The fireworks sparks therefore only brighten the background. And any black area in the fireworks video has no effect on the background.
In Adobe Premiere, the operation is called “Linear Dodge (add)”, in this menu:
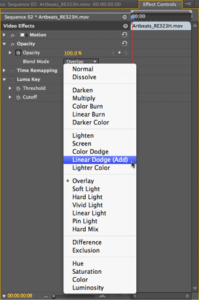
Figure 1 – Linear dodge (add) is the best mode for overlaying fireworks simulations
To generate the video assets in Finale 3D, you need to make everything other than the fireworks themselves entirely black. It also may yield a higher quality result or be more convenient in your editing software to save the assets from Finale 3D as a png sequence instead of an encoded video. Figure 2 shows the render configuration settings dialog for creating video assets in Finale 3D to be combined with others. Notice the zero brightness scales on everything other than fireworks. The output format at the top is selected to produce a sequence of png images, such as YOURNAME.000000.png, YOURNAME.000001.png, etc.
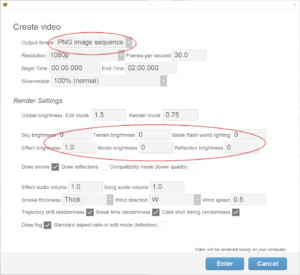
Figure 2 – Render configuration in Finale 3D for producing the video asset to be overlaid
Camera field of view
The camera vertical field of view for rendered videos is 60 degrees. Please check the “Standard aspect ratio in edit mode (letterbox)” field at the bottom of the render configuration to ensure what you see while editing the scene is the same image ratio as the exported video. The vertical field of view is the angle defined by the vertical range from the top to bottom of the image.
Coordinate system
Positions, models, and cameras all use the same, right-handed coordinate system in which X is to the right, Y is up, and Z is back toward the viewer (out of the screen in the identity orientation). Position coordinates are relative to models they are attached to, or to the global coordinates otherwise. (“Origin man” stands at the origin in global coordinates facing the positive Z axis.) Angles represented as heading, pitch, roll (HPR) can be combined as a composite rotation by rotating the identity orientation by three successive rotations, rotating first by pitch about the global X-axis, then by roll about the global Z-axis, and finally by heading about the global Y-axis, following the right-handed convention for the angles. Details of the coordinate systems are explained here: Positions coordinate system.