If you have a fixture that is not yet supported in Finale 3D, you can reach out to Finale support by email for assistance or you can create fixture definitions and effects yourself using the menu item, “DMX > Create DMX effect…“.
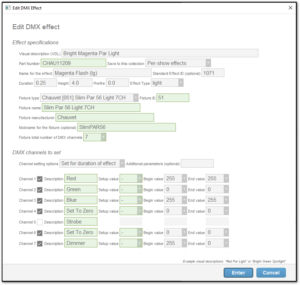
If you create DMX effects for pre-defined fixtures, you’ll fill the channel values in the pre-defined channel map, which indicates for example in Figure 1 that channel 1 is “Red”, channel 5 is “Strobe”, etc. If you create DMX effects for your own user-defined fixtures, you’ll also fill the channel descriptions in channel map, typing in the word “Red” for channel 1 and “Strobe” for channel 5, etc. The channel map you define will be embedded in the effect itself in its Custom Part Field property when the effect is saved. The next time you create an effect for the same user-defined fixture, the channel map you already created will pop up, so you do not need to type the channel descriptions again every time.

Figure 1 – The “Edit DMX effect…” dialog for a pre-defined fixture has read-only fields for the fixture properties.
Typing the words “Red” or “Strobe” into the channel map doesn’t actually have any bearing on the exported scripts, because the words you type are just labels for your own convenience. The channel values are what matters to the exported script. As you can see in Figure 1, each channel has an option for the “Begin value” and “End value”. “Begin” and “End” refer to the beginning and end of the effect. If you stretch an effect on the timeline to be 20 seconds long, then the “Begin” value will be set at the beginning of the effect and the “End” value will be set 20 seconds later. Thus, even if you need five different duration variations of an effect, you only need to create the effect once, and you can adjust the durations of the events in the script, or you can copy/paste the effect definition in the effects window and change the Duration column values to create the effect variations.
Creating effects for new fixtures versus existing fixtures
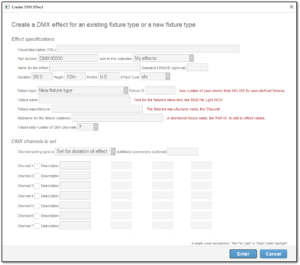
When you select “New fixture” in the “Fixture type” field of the dialog (about five rows down from the top of the dialog), the fields related to the fixture properties become editable for you to define the fixture itself as shown in Figure 2.

Figure 1 – The “Create DMX effect…” dialog for a new fixture has fields to define the fixture in addition to the effect.
The fixture related fields are the Fixture ID and the four rows immediately below the “Fixture type” field, and the channel descriptions at the bottom of the dialog. To create your own fixture definition, fill in these fields as follows:
- “Fixture ID” is a number from 100-199 of your choice. Just start 100 for your first fixture definition and count up for your other fixtures. This range of numbers does not conflict with any of the pre-defined fixtures.
- “Fixture name” is what will appear in menus for selecting fixtures, like the menu in the “Configure position as DMX fixture” dialog of Figure 3 or the edit and create dialogs of Figure 1 and Figure 2. Throughout the application, any functions that involve selecting a fixture type will present a dialog that includes all the application-defined fixture options and all the user-defined fixture options that are present in any of the effects in the script or any of the effects collections.
- “Fixture manufacturer” is just a label for your own convenience to help identify fixtures. Together, the fixture manufacturer, Fixture ID and fixture name are combined in the menu items as in, “TOMSHINE [027] Moving Head Gobo”.
- “Nickname for the fixture” is a short, usually uppercase, abbreviation for the fixture like “TSMHG”, which is combined with the Fixture ID, Effect ID, and effect name as in “TSMHG [027/1011] Red Flash (lg)” to construct the effect description. The nickname is useful because you may have different fixtures that each have their own “Red Flash” effect, and it is nice to be able to tell at a glance what fixture an effect applies to.
- “Fixture total number of DMX channels” is the total number of DMX channels in the fixture’s DMX channel map. This is the number of channels that need to be allocated for each fixture in a 512 channel DMX universe. For example, if the fixture has 20 channels then two fixtures back-to-back in a 512 channel DMX universe may allocate channels 1-20 and 21- 40.
DMX channels to set
The bottom section of the dialog defines the channels that will be output in the exported script to implement the effect. It is important to keep in mind that the DMX channels in the exported script control what happens in the real world. The VDL, Duration and Height fields at the top of the dialog control what the simulation will look like, but absent the channel values they are decoupled from the real world. When you create a DMX effect in Finale 3D, you are actually defining two things — what the simulation looks like and what DMX channels are output. You would like the two things to match. After all, if you are designing a show with a red par light, it would be confusing if the red par light simulation corresponded to a different color in the real world!
To help keep the simulation and real world matching, the channel rows in this dialog include a “Begin value” and an “End value”, which are the channel values for the beginning and end of the effect. If you change the duration of the effect on the timeline or in the effects window, the duration will apply both to the simulation and also to exported DMX channels, keeping them consistent. Look at channel 7 in Figure 1. The “Dimmer” channel is set to 255 at the beginning of the effect (on) and 0 at the end (off), which is what you would expect.
The “Channel setting options” field in the dialog above the channel rows has three options. The “Set for the duration of the effect” option indicates that channels will need a value set at the beginning and end of the effect. The “Set forever” option indicates that only a beginning value is required, which will hold forever or until a subsequent effect changes the channel to something else.
The “Set prior to effect” option applies the “Setup value” in advance of the effect’s beginning time in order to give the fixture enough time to prepare for the effect. Light fixtures with gobos or color wheels, and any fixtures with moving heads or nozzles need preparation time to position the wheel or head at the desired angle prior to the effect, so that when the effect turns on it is already aiming in the right direction and showing the right color or gobo. For this option, please see Programmer documentation: The DMX Patch field and Programmer documentation: Special VDL terms for DMX effects like “Move-To” and “With Strobing” for more instructions.
If you are defining a new fixture, you should fill in descriptions for all the channels of the fixture’s channel map whether or not the specific effect you are defining applies values to the channels. If the effect does not apply a value to a channel, uncheck the checkbox for the channel so the effect leaves it alone. The example in Figure 1 leaves channel 5 unchecked so that strobing can be turned on or off independently using a “With Strobing” modifier effect. Alternatively, instead of defining “Magenta Flash (lg)” that is independent of the fixture’s strobing characteristic you could define a “Strobing Magenta Flash (lg)” that is intrinsically strobing. You would then check the checkmark of channel 5 and set the strobing channel value to a value corresponding to a strobing frequency at the beginning of the effect, and zero at the end of the effect to turn off the strobing characteristic.
The VDL of the effect should match what the effect’s DMX channel specifications actually do. A “With Strobing” effect should have VDL that modifies other effects that the “With Strobing” effect overlaps (e.g., “Nonphysical Modifier DmxStrobing10Hz”). By contrast a “Strobing Red Flash” effect should have VDL that creates the red light in addition to making it strobe (e.g., “Red Par Light Modifier DmxStrobing10Hz”). The special VDL terms are described in Programmer documentation: Special VDL terms for DMX effects like “Move-To” and “With Strobing”.
Special DMX channels values: variables
The channel value menus include numbers 0-255 and also include a list of variables like :duration10 or :pan540. As explained in Programmer documentation: The DMX Patch field, these variables can hold channel values from 0-255 corresponding to aspects of the effect as is used in the show. The variable :duration10, for example, is the duration of the effect in hundredths of a second. The variable :pan540 is the pan angle of the effect in the show after converting 0-360 degrees to channel values 0-170, i.e., based on a 540 degree range of the fixture. In general, for types of fixture effects that cannot be represented as simple numbers from 0-255 at the beginning and end of effects, the variables translate the necessary effect characteristics to channel values or channel offsets.
There are some types of effects that are too complicated to represent with simple numbers or variables for the channel values. The “MagicFX [003] Mode 1 Flamaniac” fixture, for example, has five on/off channels that control the flame output of five nozzles at five pre-defined angles from -45 to 45 degrees. Thus, depending on the tilt angle of an effect in the show design, a different channel needs to be set on to match the angle. If the effect in the show is aiming up, channel 3 needs to turn on. If the user drags the effect’s trajectory angle to -45 degrees left, channel 1 needs to turn on. Since the angle controls which channel turns on, it is not possible to represent effects for this fixture mode directly in the channel rows of the dialog. The solution requires a variable for the channel offset, as opposed to a channel value. The offset is based on the angle of the effect. The “Additional parameters (optional)” field just above the channel rows in the dialog provides a place for all the parameters that don’t fit in the channel rows. For this particular effect, the channel rows are all unchecked and the “Additional parameters (optional)” field contains: :tilt45ToChannelOffset0To4 255 0.
For the majority of effects, simple numbers are sufficient for channel values. The channel value variables and the additional parameters field accommodate the more complex effects. If you are trying to define effects for a new fixture that needs some new channel value variables that aren’t in the list of Table 2 of Programmer documentation: The DMX Patch field, please contact support@finale3d.com and ask the Finale support team to add additional variables to the software to support your fixture.
Effect specifications
Returning now to the effect specifications at the top of the dialog, the nine fields define the effect specifications as follows:
- “Visual description (VDL)” is the visual description, like “Red Par Light” or “Green Spotlight Move-To”; or for more esoteric effects like “With Strobing” the visual descriptions may look like “Nonphysical Modifier DmxStrobing10Hz”, as explained in Programmer documentation: Special VDL terms for DMX effects like “Move-To” and “With Strobing”.
- “Part Number” and “Collection” define where the effect is stored, same as for non-DMX effects
- “Name for this effect” is just the name of the effect. It will be combined with the fixture nickname, Fixture ID, and Effect ID to construct the full effect description field, like “TSMHG [027/1011] Red Flash (lg)”
- “Standard Effect ID (optional)” is a number that defines the meaning of the effect, to support features like Fixture cloning which converts a fixture in a show to a different type by translating the effects for the old fixture into effects with the same Standard Effect ID for the new fixture type, and to support warning messages for missing safety channels for fixtures that need them. The Standard Effect ID is optional; just leave the field blank or use the value 0 if you don’t care. If you do care, you can look up the lists of Standard Effect IDs in Standard Effect IDs for flames and sparks and Standard Effect IDs for lights; please email support@finale3d.com if you would like to add some Standard Effect IDs to the list that Finale maintains.
- “Duration” and “Height” are effect attributes that affect the simulation and that may also affect the DMX channel outputs if linked by way of DMX channel value variables.
- “Prefire” should be zero for any DMX effects other than Move-To effects. This attribute has a special meaning for DMX effects: it is the maximum “reach back” of a Move-To effect (see Move-In-Black (MIB) and Move-To) that limits how far back the effect that defines the starting point of the movement can be (usually a Move-In-Black effect). The prefire does not affect the begin time of effects.
- “Effect Type” for DMX effects is one of four values that make sense for DMX effects: “sfx”, “light”, “flame”, and “other_effect”. The “sfx” is the default, and can be used for everything. “light” is the same as “sfx” except that it is just a different word, which can be useful for filtering. “flame” effects are also the same except they have fixed durations that cannot be changed on the timeline for individual events (so if you see “flame” effects of a particular part number on the timeline, you know for sure they are all the exact same duration; whereas if you see different “sfx” or “light” effects you don’t know that for sure because their durations could have been modified); for “other_effect” and further explanation, see Why is ‘Type’ so important? What depends on it?.
What to do after defining your effects
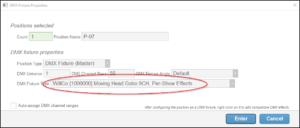
Once you’ve defined your effects, right-click on a position and choose “Configure position as DMX fixture” and you’ll have the option of picking any application-defined or user-defined fixture that is present in the loaded effect collections, including your My Effects and Per-Show Effects.

Figure 3 – The “Configure position as DMX fixture” menu item will include your user-defined fixtures as options