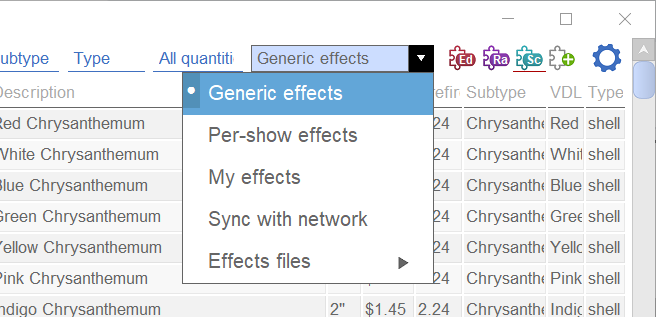
The effect window in Finale 3D and the effect palette in the upper right of the design view are the two ways of viewing your effects. Both the window and the palette show one specific “Collection” of effects at a time, which you can select from the blue selector of the effect window or from a link at the bottom of the effect palette. The collections are, “Generic effects”, “Per-show effects”, “My effects”, plus any effect databases that you’ve created as local files, plus any Finale Inventory accounts that you are connected to (see Account setup) .
The Generic effects are the 6,000 or so default effects included with the application as a starting point. They are read-only effects. The Per-show effects is the collection of effects that is saved with the current show being edited. When you insert an effect into a show from any collection, the effect definition is copied into the Per-show effects so that the show is self-contained, without any references to external effects lists. The My effects is your personal effects collection, saved in the cloud.

Figure 1 – The effect window shows one collection of effects at a time.
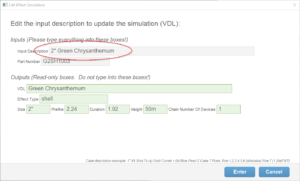
To create new effects, use the menu item “Effects > Create new effect…” which brings up the dialog shown in Figure 2. In this dialog enter a full description of the effect into the Input description field, and then look at the green fields below, which show how Finale 3D interprets your input description. Your input description should always include the caliber/size of the effect. Depending on the how much detail you want to provide, you can also provide the duration, height, and prefire, as well as timing and firing pattern information for cakes. Instructions for typing in the input description are given in the “VDL” section, “finale3d.com > Documentation > VDL documentation”. VDL, which stands for “Visual Description Language”, is the pyrotechnics language in which you can define arbitrary effects. Notably, the input description in this dialog is not a search box. The software will actually construct a new simulation based your description as a recipe. Try typing something complicated like “50mm red to blue to green chrysanthemum with strobing pink pistil with gold tail” to see how your description is interpreted!

Figure 2 – Enter a full description, including caliber, into the input description field
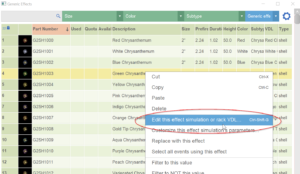
The easiest way to edit effects is to right click on them in the effect window, and then to select “Edit this effect simulation or rack…” in the context menu, as shown in Figure 3.

Figure 3 – Right click on an effect row and select “Edit this effect simulation or rack…” to edit effects.
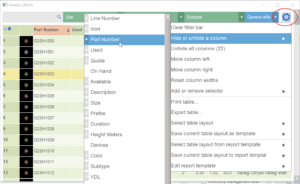
The rows in the effect window are effect definitions themselves, comprising about 30 attributes that are shown in the columns. Most of the columns are hidden by default to make the information manageable. From the blue gear menu in the upper right of the effects window, select “Hide or unhide columns” to look at the available columns, and unhide any that you are interested in.

Figure 4 – From the blue gear menu in the upper right, select “Edit this effect simulation or rack…” to edit effects.
There are a few special columns in the effect window that are not attributes — “Line Number”, “Icon”, “Used”, “Quota”, “On Hand”, and “Available”. The Icon is automatically generated based on the other column values. The Used, Quota, and other quantity columns are described in Inventory management basic instructions. All the rest of the columns are the attributes that define the effect itself. Their meanings are defined in Effects table columns.
To import effects from a CSV file (see Importing inventory) , you simply need to have the columns in your CSV file that you want to import, and one row per effect. The only required column is “Part Number” because the part number is the identifier for each effect. Depending on your language setting (“File > Languages”), the column names may not be in English. When you import, your CSV file column headers should match what you see in the effect window in your selected language — or, to create a language independent CSV file, you can use the Finale 3D internal column names in your CSV file (column 2 in Table 1, below), which will always work no matter what language you have selected.