Since almost everyone in pyrotechnics has a different preference for labels, it is important that a labels engine is customizable. In Finale 3D Pro, you can customize what information is in the labels, how it is formatted, the colors, the field sizes, and text sizes and padding. You can customize the page format to match the format of stickers on a sheet, such as Avery 5260, or to match the format of a roll printer, like Dymo 30252. You can customize the padding around the edges of the labels to accommodate for slight misalignment. You can customize the sort order of the labels, and whether they print out in columns or rows. You can print out one label per chain or one label per shell in the chain. You can define the criteria for page breaks. You can filter to arbitrary positions or product types or any other characteristic. In short, the labels in Finale 3D have a terrific amount of customization flexibility.
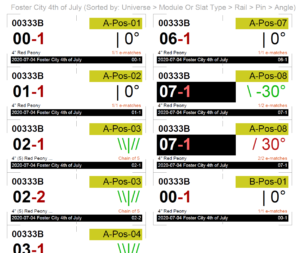
Figure 1 – Example labels printout
What labels can contain
Figure 1 shows part of a labels printout, to illustrate some of the content that can be in the labels. In this template, the upper left is the part number of the item. Below it in two colors is the firing system address. The top right is the launch position, and below that is the mortar angle. Notice that the mortar angle is color coded and contains both a number and angled line. If the label represents multiple shells, such as a chain, the mortar angle graphics show lines for all the shells.
Below the address on the left is the name of the effect. Below the angle on the right is a red “e-match hint” that tells the crew if multiple e-matches are connected to the same firing system pin, or if the label represents a chain. The middle two labels on the right are a V-pair of shells on the same firing system pin. Notice the firing system address field has inverted colors on a black background for only these two labels. That is an extra bit of formatting finesse to call attention to the fact that these two items are e-matched together on the same pin.
The bottom row in black includes the show date and name on the left, and a duplicate of firing system address on the right. The reason for duplicating the firing system address is to support folding the label in half, so either side you look at has the address on it (as well as being a backup in case one side of the label gets smudged or torn). On the subject of folding the labels, the thin lines in the corners and the tiny vertical lines in the center are there to help you ensure your labels are aligned to the sticker, and as guidelines for where to fold if you are folding them in half. These lines are also optional in the customizations.
Choosing a pre-defined labels template
The Finale 3D software includes a set of pre-defined labels templates that may be just what you need, or are at least a good starting point if you want to customize them further. In the main “File” menu, the labels menu is divided into five sections. The first four sections are sorted in different orders. The fifth is a set of labels specifically for chains. Each of the sections has a submenu of different pre-defined labels templates corresponding to formats commonly used in the pyrotechnics industry. If you use one of these format, then try printing out labels for your show and see if the result happens to be what you need!
All of the pre-defined labels templates other than the chains labels are configured to print out a single label per chain. The chain labels templates, by contrast, print out one label per shell or other item in the chain, and only print out labels for these items in chains. Thus if you want to print out labels for your entire show, including one label per item in the chain, then you can print out two batches of labels: a first batch with one label per chain, using any of the sort options; and a second batch of just the chains with one label per shell in the chains, using one of the chain labels options.
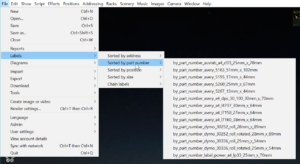
Figure 2 – Five different labels arrangements, each with many options for different sticker formats.
Customizing a labels template or creating a new one
The blue gear menu in the upper right of the script window has a menu item, “Create or edit labels template” (See Figure 3). This menu item opens the dialog of Figure 4, which edits the selected labels template or begins a new one. Labels templates are stored as blueprints, so when you edit an existing template or create a new one, the resulting blueprint will be one of the rows in the blueprints window.
You can see all the pre-defined labels templates and any additional templates you create by selecting the menu item, “Window > Blueprints window” and scrolling through the rows. You can also copy/paste blueprints from one show to another as described in Copying report and labels templates between shows. One thing to note is that the blueprints window contains other types of blueprints as well, like report templates and addressing blueprints. The leftmost column in the blueprints window, “Type”, indicates what kind of template each blueprint is.
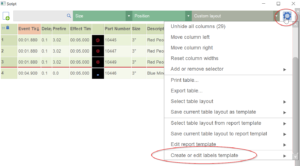
Figure 3 – The blue gear menu in the upper right of the script window has a menu option for creating a custom label, at the bottom of the menu.
Filtering rows
The dialog of Figure 4 includes all the customization fields for the labels template, beginning with the name, which is what identifies the blueprint, the title, which is what is printed at the top of the page if there is room, and the filter, which optionally filters the set of script rows used to generate the labels. For most applications the filter is blank because the most common need is to print labels for all the rows in the script, possibly combining chain rows into the same label.
The filter can be used for special purposes, like excluding cakes or printing out labels only for a set of launch positions. Any filter expression that you can type in the script window’s search box is also valid in the labels template filter field. You can exclude cakes by typing “parttype != cake”. You can print labels only for positions containing the word “front” by typing, “position += front”. A pre-defined template that makes use of the filter field is the chain labels template. Its filter field contains “chainref != “”” to exclude any row that does not have a chainref value (shown in the Chain column in the script).
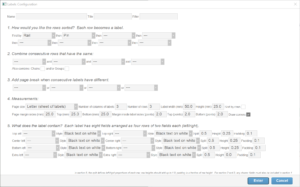
Figure 4 – The labels customization dialog controls the label’s format, its page layout, and what’s in it.
Combining rows
Section 1 of the dialog lists the fields for sorting the labels. Section 2 combines consecutive rows that agree on all the specified terms (if any terms are specified). If you wanted to print out one label per module, for example, you could sort the labels by module number and then combine consecutive rows that agree on the module number. The labels will be generated from the combined rows. Some of the script fields have special formatting functions that handle combined rows. In fact, an example of these special formatting functions is prominent in Figure 1 at the top of this article: the angle field shows line graphics depicting the angles of all of the rows combined together into the row that generates the labels. That is the mechanism by which the three labels depicting chains in Figure 1 have five green lines in the angle field.
Section 2 also has checkboxes to combine rows that are part of the same chain, or part of the same group. These checkboxes are independent of the specified combining terms, and they can be used together. Combining by chains is quite common, because users more often prefer one label per chain to one label per shell in the chain. All the pre-defined labels templates except the chain labels templates have the combine-by-chain checkbox turned on.
Label measurements
Section 4 specifies the layout of labels on the page. With the controls in this section, you define the number of rows and column that fit within the sheet of paper. You also select the size of the sheet of paper (letter or A4) or in that same selector you can choose options for one-label-per-sheet, which is what is used for printing rolls of labels.
Label manufacturers provide template specifications for their label sheets, which you can use to fill out the fields in Section 4. After specifying the number of rows and columns and dimensions of the labels themselves, you need to specify the page margins surrounding the matrix of labels (sides, top, and bottom) in millimeters. This collection of information uniquely defines the dimensions of the gutters in between the labels, so even if your template specifications from the label manufacturer provide measurements for the gutters, you do not need to enter that information in Section 4 because it is redundant.
The last three fields in Section 4 specify the interior margins within the labels. These margins have nothing to do with the specifications from the label manufacturer. Their function is to contract the information displayed in the label to pull it away from the edges, making your printed labels more tolerant of minor alignment errors that arise during the printing process. The more you increase your interior margins, the less likely it is that information near the edges might get cut off. There’s a cost of safety, though. The larger your interior margins, the smaller the text in the labels, which may make them harder to read.
Section 3 also pertains to the format of labels on the page. You can insert page breaks by specifying the page break fields. With the rows in sorted order, whenever two consecutive rows differ in any of the page break fields, a page break will be inserted.
The “Shift interiors away from zero-margin page edges” checkbox enables special formatting for label templates in which labels are flush against the edges of the page, like the “Austab CL33 A4 25.4mm x 70mm” label template. Most printers have unprintable area near the edges. You can enlarge the label interior margin parameters to move the label’s text away from the label edges to avoid the unprintable area of the page, but that results in wasted space since the labels on the right edge of the page do not need extra space on their left side, and the labels on the left do not need extra space on their right side. The labels in the center of the page don’t need any extra space at all because they are miles away from the unprintable area. The “Shift interiors” special formatting applies only to the labels adjacent to the edges of the page, moving their interiors toward the center. If your labels template has labels flush against edges, this formatting option will give you more area in your labels for text.
Dividing the label content into boxes
Section 5 of the labels dialog contains the fields that control what is displayed in the label, and how it is formatted. The label content is divided into eight boxes, as illustrated in Figure 5. The boxes are referred to as rows — top, center, bottom, extra — each row with a left and right side.
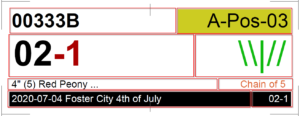
Figure 5 – The label content is divided into eight boxes (four rows, each with left and right boxes).
The heights of the four rows are all relative to the interior height of the label, inside the interior margins. In Figure 5, the interior margins account for the fact that the red outlined boxes do not cover the complete area inside the four corners reflecting the actual dimensions of the label. The heights of the four rows should add up to 1.0. If you only want three rows in your labels, you can make the first three rows’ heights add to 1.0 and give the last row a height of zero to shrink it out of existence.
Each row has a “split” parameter that divides the row into left and right sides. The split parameter should also be a value from 0 to 1.0, with the value 0.5 indicating the left and right sides are split evenly. The “Vertical padding” field for each row controls the amount of spacing above and below the text within the row’s boxes. The padding number is from 0 to 0.5, indicating what fraction of the row’s total height is used for spacing. The padding value is usually around 0.1 or 0.2. The value 0.0 makes the text expand maximally in the box. The value of 0.5 allocates all the area of the row to the whitespace, shrinking the text out of existence.
The “Horizontal padding” field for each row controls the spacing inside the left and right edges of the row’s boxes. The horizontal padding number is also a fraction of the row’s total height, except it isn’t limited to 0.5 since it isn’t limited to the height of the row.
Section 5 of the labels dialog has two selectors for each box, defining what data the box displays, and how the data is formatted. The options are explained in the next paragraphs.
Selecting what is displayed in the boxes
The first selector for each box specifies what goes into the box. The options include all the columns from the script window, in addition to special fields shown in Table 1.
Table 1 – Field values
| Field Value | Explanation |
| Part Number, Size, Type, Duration, etc. (the columns in the script window) | Same as in script window, with the exception of Angles* and Address |
| Angles* | Displays ASCII angle graphics characters (\|/), one per device, followed by the numerical angle if and only if all devices represented by the label are shot from the same angle. For example a “V” shaped pair of shells is written as “\/” without any numerical angle, whereas a pair of shells both at 30 degrees to the left is written as “\\ 30°” (but not “\\ 30° 30°”, as it is shown in the script table). |
| Address | Similar to display in script window, except removes leading zeros on the pin numbers while continuing to sort by their numerical value (2 before 10 without requiring 02). If the label represents multiple (and different) addresses, then the Address field will be blank. |
| Pin | Same as in script window. If the label represents multiple addresses, then the pin numbers will be printed in ranges as efficiently as possible using “..” for ranges. For example, if pins 01..05 and 95..99 are all represented by the label, then Pin field will contain, “01..05 95..99”. |
| Module | Same as in script window. If the label represents multiple addresses, then the module numbers will be printed in ranges as efficiently as possible using “..” for ranges. For example, if modules 01..05 and 95..99 are all represented by the label, then Module field will contain, “01..05 95..99”. |
| Rack Angle, Rack Annotation, Rack Description, Rack Number, Rack Part Number, Rack Size | Properties of the rack containing the effect. For example, the Rack Angle is the angle of the rack, not necessarily the angle of script event from which the label is generated since racks may have angled tubes or adjustable angle tubes within the rack. Similarly, the Rack Part Number and the Rack Size are properties of the rack, not the effect. These fields are more often used for rack labels than effect labels. |
| Rack Cluster Annotation | The Rack Cluster Annotation is similar to the Rack Annotation field except that the annotation is actually the first non-empty annotation of any of the racks in the rack cluster containing the rack that contains the effect of the script event from which the label is generated. When racks are arranged in clusters, it is common that only one of the racks in the cluster will have an annotation, which the user centers under the cluster to represent the whole cluster. Rack labels for such arrangements should identify the cluster that the rack is part of, to help the crew. If only one of the racks in each cluster has its own annotation, then the Rack Annotation field will be blank for all the other racks, whereas the Rack Cluster Annotation field will apply to all the racks in the cluster. |
| Rack Part Number And Description, Rack Size And Description | Combinations of two values, to fit more information into a single box on the label without requiring two boxes. |
| Show Name, Show Date, Show Location, Show Field #1, Show Field #2 | Show properties from the menu “Show > Set show information” |
| Show Date And Name, Part Number And Description, Size And Description | Combinations of two values, to fit more information into a single box on the label without requiring two boxes |
| E-Match/Chain Verbose Hint | A short hint about the e-match, chain timing, and/or delay fuses relating to the label (see Table 2) |
| E-Match/Chain Concise Hint | An alternative, more concise hint about the e-match, chain timing, and/or delay fuses relating to the label (see Table 2) |
| Pin Absolute | The pin address relative to the module, as opposed to the pin address relative to the slat, but otherwise the same as the Pin field described above. This value is useful for firing systems with slats or splitter boxes or virtual slats that use an absolute numbering system for the pin addresses. |
| Module/Pin Address | A combination of the Module and Pin Absolute fields, analogous to the Address field but converting the three part addresses from Module-Slat-Pin into two-part addresses with absolute pin numbering relative to the module itself, as in Module-Pin. If the label represents multiple addresses, the formatted output consists of the range of modules, then dash (“-“), then the range of mins. There is no way to know which pins belong with which modules. For example, if the label represents module 01, pins 95..99, and module 02, pins 01..05, the printed output will be “01..02-01..05 95..99”. |
| Module | The module number, by itself; same as the Rail if the firing system does not use slats. This field is useful in combination with the Pin Absolute field, for firing systems with slats or splitter boxes or virtual slats that use an absolute numbering system for the pin addresses. |
| DMX Channel Base, DMX Channel Range, DMX Universe, DMX Fixture Angle, DMX Fixture Name, DMX Fixture Nickname | Properties of the DMX fixture (i.e., launch position configured as fixture). To print one label for each DMX fixture in the show, create a blueprint as follows: 1) filter events by Part Type in the blueprint’s filter field with the text: parttype=”light” || parttype=”sfx” || parttype=”flame”; 2) sort events by position name; 3) combine rows having the same position; and 4) configure the label content with the desired DMX information fields, which refer to properties of the position and the fixture that the position is configured with. Most of the DMX information fields match the columns of the positions table. The DMX Fixture Angle field is “Pan 180” if the position is configured with the “Pan 180 (mirror)” option to turn it around. |
With regard to the Pin Absolute, Module/Pin Address, and Module fields, use these field to print labels with addresses based on module and pin (no slat). For example, if you use virtual slats (see Slats, virtual slats, and splitter boxes) to divide 32-pin FireOne modules into 4 slats of 8 pins each with addresses XXX-A-1, XXX-A-2, …, XXX-A-8, XXX-B-1, … then the corresponding module and absolute pin addresses are XXX-1, XXX-2, …, XXX-8, XXX-9, …
E-match/chain hints in the labels
The “E-Match/Chain Verbose/Concise Hint” field is a short phrase indicating the number of e-matches, or shells in a chain, or delays. The “Verbose” messages provide a hint for almost everything, including “1/1 e-match” for a single effect in non-exceptional circumstances. The “Concise” messages shorten the text a little, and ignore the common case of “1/1 e-match”, which makes the hints coincide with only the notable, non-common cases. The choice between verbose an concise hints is a personal preference. Table 2 shows the possible messages, which can be combined.
Table 2 – E-match/chain hints
| What Label Represents | E-Match/Chain Message |
| Chain of 5 shells with short delays or irregular delays between shells | Chain of 5 |
| Chain of 5 shells with same delays between all shells of 2.0 seconds | Chain of 5 x 2.0s |
| Chain of 5 shells with 2.0 second delay in front of chain | Chain of 5; 2.0s |
| Third shell in chain of 5, the shell separated from the previous shell by 2.0 second delay | 3/5 in chain; 2.0s |
| First e-match of three on same pin | 1/3 e-matches |
| 2.2 second delay fuse before effect | 2.2s delay |
One of the pre-defined labels formats (“Chain labels”) prints one one label per shell in chains, and is filtered to chains only. The label format includes a verbose e-match/chain hint that specifies the delay before shell for each shell in the chain. Thus the information on these labels is exactly the information required to build arbitrary chains. You can use this labels format or one like it as an alternative to a chain building report printed as a table, if you like the idea of having a label for each shell in the chain that includes the delay in front the shell.
Selecting how the information in the boxes is displayed
The second selector for each box specifies the format or style of display in the box. The simple examples are just the color of the text and the color of the background, or outlining the box. Other styles, denoted as “Fancy”, do special formatting depending on the field value, such as changing the color based on the size. The options are shown in Table 3.
Table 3 – Field styles
| Field Style | Explanation |
| Black text on white, Red text on white, etc. | Colors of text and background |
| Bold black text on white, Bold red text on white, etc. | Colors of text and background, with bold font |
| Black outline on white, Black outline on red, etc. | Outline around the box |
| Fancy angle colors | Color is green if left-aiming, black if up, red if right-aiming, blue if upward but turned around 180 degrees |
| Fancy size colors | Color depends on size of effect, e.g., 3″ is different color from 4″ |
| Fancy address colors | Two colors, black for the first part of the address and red for the second part, to distinguish the module from pin numbers visually; also color of text and background will invert (white text on black background) if multiple e-matches on same firing system pin, to call attention to that fact |
Text justification in the label boxes
Paragraph 5 of the labels customization dialog (see Figure 6) gives you options for justifying the text in any of the boxes to the left edge, right edge, center. The default is “smart”, which will automatically be left justification for the left boxes; and which will be right justification for the right boxes — unless the right boxes are wider than 50% (i.e., split < .5), in which case they will have left justification.
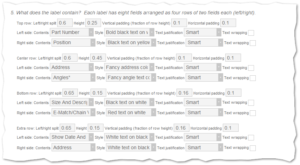
Figure 6 – Any of the fields can have left, right, or center text justification.
Some labels uses like that shown in Figure 7 require center justification within the label. It is easiest to use only the left boxes by making the row splits 1.0 (100% left, 0% right), and setting the text justification for the left cells to “Left”.
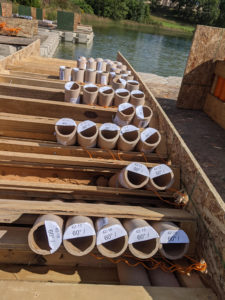
Figure 7 – Set the split to 1.0 and use the left boxes if your labels require center justification.
Text wrapping
The text wrapping checkboxes in Figure 6 apply to the eight content boxes of the label independently. If text wrapping is on, the text of the field will wrap into multiple lines of the same height (i.e., same font size) instead of being one line that clips on right edge of the box. Multiple lines obviously consume more vertical space in the content box than a single line, so if you expect text to wrap into multiple lines you need to specify enough vertical padding to accommodate the extra lines. The content box itself will remain the same height.
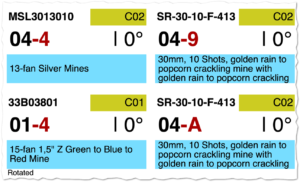
Figure 8 – Text wrapping example of four labels — the blue box has enough padding to accommodate three lines of wrapped text.
You can calculate the amount of padding required based on how many lines of text you want to allow for. If the content box contains a single line of text, the height of that line of text as a fraction of the interior height of the label is:
Text height = Row height - (2 * Vertical padding)This line height equation is easy to visualize. The line height, which is also the font size, is sandwiched between two equal amounts of vertical padding. The two slices of vertical padding plus the line height add up to the full height of the row. Thus the greater the vertical padding, the smaller the line height and thus the smaller the font size. If you make the vertical padding 0.5, then there’s no room left for the line of text, which has zero height according to the equation. The value 0.5 is thus the maximum value for vertical padding.
If the content box contains multiple lines of text, the lines of text each have the same height as would a single line of text. The same line height equation applies no matter how many lines of text result from wrapping. Consequently, if there are multiple lines of text they will overwrite the padding above and below until there is no more padding, at which point the top line will remain clamped flush with the top of the content box and the lines extending below the bottom of the content box will be clipped.
To calculate the approximate amount of vertical padding required for N lines of text, the vertical padding should be:
Vertical padding = (1 - 1 / N ) / 2Following this vertical padding equation, if you want enough room for two lines of text (N=2), you need (1 – 1/2)/2 = 0.25 vertical padding. If you want three lines of text (N=3), you need (1 – 1/3)/2 = 0.333 vertical padding. The sandwich visualization makes these examples obvious. Vertical padding of 0.25 above and below a single line means the line height must be 0.5, since 0.25 + 0.5 + 0.25 = 1.0; if the height of one line is 0.5, then one more line will consume an additional 0.5 which equals the sum of the two 0.25 vertical padding slices exactly. Similarly vertical padding of 0.333 results in a line height also equal to 0.333, and thus the two slices of padding will accommodate two additional lines.
After calculating the approximate amount of vertical padding, if you are aiming for an exact fit you will need to add a tiny amount to the calculated value to offset a tiny, one point adjustment that Finale 3D applies to the final result. It tends to look better to have a tiny but non-zero minimum amount of whitespace (one point) above the text lines even in the cases that they are consuming the entire vertical padding space or more. In light of that, Finale 3D protects a one point sliver of the vertical padding above the text lines from being overwritten, which therefore requires an extra one point of padding below to accommodate the shift. It is possible to calculate the precise adjustment required, but generally it is easier to fine tune the proportions by eye, starting with the approximate calculated values.
Table 4 – Template file provided by Avery for debugging printer scaling problems; and example labels files
| Download link | Explanation |
| avery-5260-template.pdf | Avery template for 5260 labels |
| example_labels_label_per_chain.pdf | Example labels printout with one label per chain |
| example_labels_label_per_shell.png | Example labels printout with one label per shell |