The Pinboard Cue Sheet report presents the list of cues for an operator to take some action in a manually fired show: to press a button on a firing system controller or to electrify a pin on a manual firing pinboard. Each cue is a pin number or a pin/bank number if the controller has multiple banks of pins. Since the cues are sequential for the benefit of the operator, the distinguishing characteristic of manually fired show scripts is that the pin or pin/bank numbers of the show are always in chronological order.
In Finale 3D, the banks of pins are represented by the “Rail” addresses, which are often letters. Thus, analogous to how the the rail/pin address represents a module/pin or module/slat/pin for a computer fired show, the rail/pin address represents the bank/pin for a manually fired show, the only difference being that the rail/pin addresses in the manually fired shows are in chronological order.
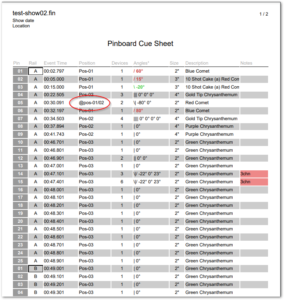
The Pinboard Cue Sheet report lists the pin number first and highlights it for the operator since the pin number is the button the operator needs to press for every action. The operator doesn’t need to concern himself with the rail address for every single cue, only when the bank changes. Since banks of pins may have 25 or 50 or even 300 pins, the bank switching actions are relatively rare. Whenever a bank switch is required, Pinboard Cue Sheet reports calls attention to the fact with a black outline around the bank number. You can see in Figure 1 that bank “A” is outlined on the first row; and that the next outlined bank is “B”, twenty-five rows later!

Figure 1 – The Pinboard Cue Sheet shows position group names in Position column for rows that represent multiple positions.
Every line in the Pinboard Cue Sheet report is a separate action. If an action fires effects from multiple positions in parallel, the names of all the positions involved would need to be combined somehow into the Position column in the report, but there would rarely be enough room to list them all on the page.
The circled cell in Figure 1 shows the solution to this formatting conundrum. Cue 05/A fires shots on Pos-01 and Pos-02. Rather than displaying the position names in a list, the report shows a position group name chosen by the user for the group of positions. In this case “Pos-01/02” is shorter than “Pos-01, Pos-02” but it could be even better. The user can make position group names that are recognizable, like “Front” or “Shell Positions” or “Rooftop-A”, etc.
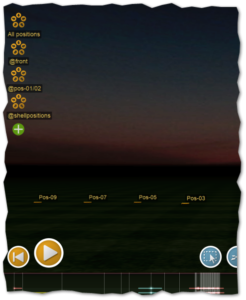
You can make position group names by selecting a set of positions and doing the menu item, “Positions > Position groups > Create position group…” Finale 3D automatically creates position groups when you insert effects into multiple positions at once. The position groups are displayed as orange flowers on the left side of the screen, as shown in Figure 2. You can click on the name of the position group underneath the flower to rename or delete it.

Figure 2 – The orange flower position group names are displayed in rows that represent multiple positions.
Combining all events with the same rail/pin onto the same row is a little different from the combining that the Wiring Script report does. Notably, the Wiring Script requires that combined rows have the same Position, but the Pinboard Cue Sheet report does not. You can see the Pinboard Cue Sheet report’s combination criteria in paragraph 2 of its report configuration dialog, which you can get from the Script window’s blue gear menu by doing “Edit report template…” and choosing “basic_cue_sheet_portrait”. The word “Position” is not in any of the selectors of Figure 3.

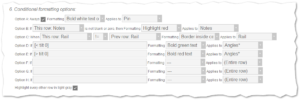
Figure 3 – Script rows are combined only if they have the same Rail, Pin, and Effect Time; but having the same Position is not required.
The Pinboard Cue Sheet report also highlights non-empty notes fields in red, to call your attention to the notes. The highlighting and the outlining of the rail addresses are accomplished with the conditional formatting options in paragraph 6 of the report configuration dialog shown in Figure 4.

Figure 4 – The conditional formatting parameters highlight fields based on logical expressions.
Conditional formatting
From the Script window’s blue gear menu, do “Edit report template…” and choose “basic_cue_sheet_portrait” to see the configuration dialog with the paragraph 6 shown in Figure 4. For this report,
- Option A inverts the colors of the Pin column.
- Option B highlights the notes in red if they are not blank.
- Option C outlines the Rail cell whenever it changes from the row before.
- Option D and E add the colors for angled effects.
- The checkbox at the bottom turns on the zebra striping of every other row in light gray.
