Site layouts for shows that are miles across generally don’t fit on a single page with a sufficient level of detail to see what is going on, so a site layout diagram strategy for large shows is to create multiple diagrams — an overview diagram that groups the positions in a sensible way, plus detail diagrams that focus on the individual groups.
Overview diagram
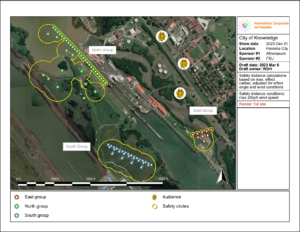
Figure 1 is an example overview site layout diagram for a show that is two miles across. As you can see in this diagram, the positions for this show happen to be organized in three groups: North, South, and East. It would thus make sense to create three detail diagrams to go along with the overview diagram.

Figure 1 – Overview diagram with groups of positions
Several things to notice about this overview diagram are,
- The positions don’t have labels
- The positions are color coded by group
- The size of the position icons themselves is not to scale
The color coding of positions is possible with the “Set position colors” context menu item accessed by right-clicking the positions in the rack layout view. If clicking on the positions one by one is too tedious, you can copy/paste the colors in the positions table window. The chosen color for a position is stored in the position’s “Diagram Data” property, which you can copy from one position to all the others in the same group.
Turning off the position labels, and adjusting the size of the position icons are customizations in the site layout diagram blueprint. You’ll want different choices for the overview diagram and the detail diagrams, so you’ll end up creating one blueprint per diagram. From the blue gear menu in the upper right of the rack layout view, choose “Create or edit diagram template” and edit the “site_layout_diagram”. Make your changes and save it under a different name for each blueprint you create.
Detail diagrams
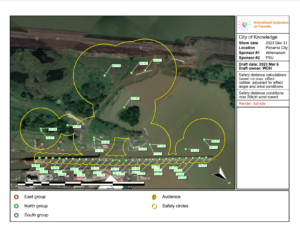
Each detail diagram shows a subset of the positions. Figure 2 is a good example, which you can recognize is the North group of positions from the overview.
Detail diagrams may be oriented differently from the overview diagram. Both the orientation and the filter that specifies the subset of positions that the detail diagram consists of are in the blueprint for the diagram.

Figure 2 – Detail site layout diagram for a subset of the positions
Position name filter
The “Position name filter” in the site layout blueprint includes all positions if it is blank. If it contains a string, the filter includes only the positions that have that string as a substring in the position name (case-insensitive substring search). The positions in the example show of Figure 1 and Figure 2 have a naming scheme of N-01, N-02, etc. for the North positions, and E-01, E-02, etc. for the East positions, and similarly for the South. Thus the position name filter value of “N-” will filter to just the North positions.
If you want to filter for multiple groups of positions, you can list multiple substrings in the position name filter, separated by commas. For example, “E-,S-” would filter to the East and South positions.
If the positions are already in position groups in the 3D view (the little yellow flowers on the left edge of the screen), then you can refer to those position groups in the position name filter by adding an asterisk in front of the group name. For example, if you have a position group named “Front”, then the position name filter value of “@front” would filter to just those positions.
Position label adjustments
The blueprints include options for position label size and color, but you may also need to adjust the labels’ coordinates to avoid overlap. Notice in Figure 2 that the labels are all stretched to pleasing callout angles. From the rack layout view, just click and drag the position labels to move them around.
Since the rack layout view may be oriented differently from the detail diagrams, with North pointing in different directions, adjusting the position labels may require trial and error: print an initial version of the site layout diagram and look for position labels that overlap or need to be moved; then drag them around in the rack layout view and print a new version of the diagram; see if the adjustments help, and repeat until getting it right.
Scale of text
The drawing tools include text boxes that are different in a few respects from traditional drawing software. The height of the font is measured in meters or feet as opposed to points since the magnification level of the diagram can change based on the coordinates and drawings. If the height were in points, which is constant for the page, then the size of the text would change relative to the background when the magnification level of the background changed.

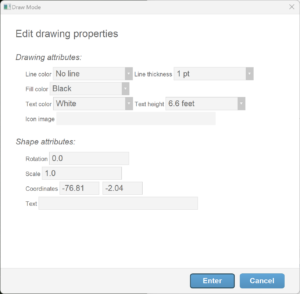
Figure 3 – If “Text height” isn’t large enough, change the “Scale” of the text box.
If you want to add text boxes on site diagrams covering a very large area, measured in meters or feet, the text boxes themselves have be correspondingly large, in meters or feet, or they will be too tiny to see. The options for text height in the “Edit properties” dialog from the context menu from right clicking on the text box, shown in Figure 3, may not be large enough for the needs of a very large shoot site, or for large text titles. If the text height isn’t large enough for your needs, you can scale the entire text box up by changing the “Scale” attribute of the text box.
