The standard report templates like the Wiring Script employ text wrapping for the Description field, as you can see in Figure 1. In this example, the seventh row has a short description that doesn’t wrap around. Most of the other rows have text that wraps around to two or more lines. The report formatting is configured to support one extra line of wrapped text, keeping the overall height of the rows constant.

Figure 1 – The 7th and 11th row in this report have short descriptions that fit in a single line; the other rows wrap the text.
The labels in Figure 2. illustrate text wrapping applied to the Description field in a label format. Whereas the standard report templates all employ text wrapping for the Description field by default, the standard label templates do not employ text wrapping. So to get a result like the labels in Figure 2 you will need to customize the label template as described in Labels basic instructions.

Figure 2 – The label in the lower right has a short description requiring a single line; the others require two or more.
The report templates can also be customized to employ text wrapping — or not — in any of the fields. The customization parameters for reports are different from labels, so please see Labels basic instructions for instructions to customize labels and continue with this article for instructions to customize reports.
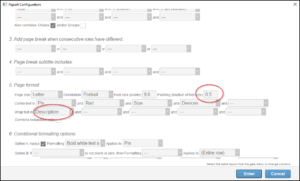
Reports and labels alike use the padding space to accommodate the wrapped lines of text. If a report row has a single line of text that doesn’t wrap, the line of text is centered with padding above it and below it. If a row has multiple lines of text, the additional lines will overwrite the padding space. To configure reports for text wrapping, you need to adjust two fields in the report customization dialog accessed from the menu item “Edit report template” in the blue gear menu in the upper right of the script or effects window, as in Figure 3.

Figure 3 – Choose the fields for text wrapping, and set the padding to accommodate the number of lines you want.
Calculating the padding for text wrapping in reports
You can calculate the amount of padding required based on how many lines of text you want to allow for. The equation is different for reports and for labels. For reports, the height of the row is calculated to be the font size plus twice the vertical padding, where the vertical padding is specified as a fraction of the font size. The larger the vertical padding, the larger the row height. A padding fraction of 0.5 means the combined padding above and below will add up to the font height, providing room to wrap one extra line of text. A padding fraction of 1.0 provides room for two extra lines of text. For reports, the padding calculation is simple. To calculate the vertical padding for N total lines of text, the padding should be:
(N - 1 ) / 2For both reports and labels, Finale 3D makes a slight adjustment to text wrapping placement to improve the visual appearance. It looks better to have a small amount of whitespace (one point) above the text lines even in the cases that they are consuming the entire padding. So Finale 3D protects a one point sliver of the padding above the text lines from being overwritten, which therefore requires an extra one point of padding below to accommodate the shift. It is possible to calculate the precise adjustment required, but generally it is easier to fine tune the proportions by eye, starting with the calculated values.