Manually fired shows in which the operator triggers each shot by pressing a button or connecting an electrical terminal can make use of a voice cues audio recording for timing. The voice cues track is usually a human voice counting out the buttons or pin numbers as instructions for the operator on a schedule that is defined in the design of the show.
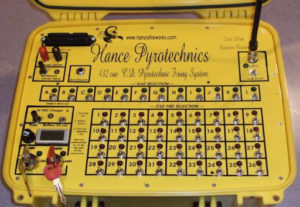
Figure 1 – A manual firing system by Hance Pyrotechnics
Finale 3D supports manually fired shows with a range of options for exporting voice cues sound tracks. The options include specifications for combining the voice cues with music, with voice cues on one channel and music on the other, or a combination. The options also include choices for the vocalization. Do you want the human voice to read off the numbers only, or numbers followed by beeps? Other specifications include the lead time in milliseconds for the vocalization prior to the launch time of the effect, which you can adjust for desired reaction time of the operator.
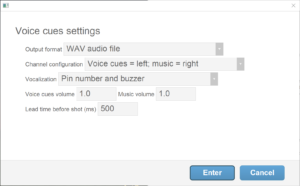
Figure 2 – Options for exporting voice cues tracks from Finale 3D
Some manual firing systems like the one shown in Figure 1 have a series of banks, each with its own set of pin numbers. Others, like the pin board shown in the Pin Board section, just have single large array of electrical terminals or buttons, maybe as many as 400! If the firing system has banks, the banks may be numbered 1, 2, 3, … or they may be named with letters, A, B, C, …. Finale 3D supports both numbers and letters for manual firing systems, but for the vocalizations in the exported voice cues track, Finale 3D will always use the vocalizations of the military alphabet (alpha, bravo, charlie, …) to indicate the bank when it changes in the sequence of shots. For manual firing systems with numbered banks, then number 1, 2, 3… correspond to alpha, bravo, charlie, … in sequential order.
The voice cues in the exported voice cues sound track correspond to the firing system addresses of the shots. Thus it is important that the addresses of the shots are in chronological order, and that each “shot” has its own address (pin number). When you address the show for voice cues, please configure the settings in the “Addressing > Address show…” dialog to have 1) a large limit on e-matches per pin, 2) order of assignment by event time (chronological), and 3) no constraints on modules (not constrained to the same position), as shown in Figure 3, for otherwise you might have voice cues out of order or multiple voice cues at the same time.
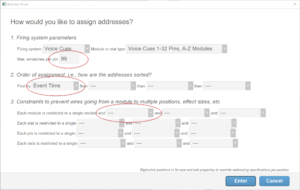
Figure 3 – Addressing settings for pin board shows must have 1) a large limit on e-matches per pin, 2) order of assignment by event time (chronological), and 3) no constraints on modules (not constrained to the same position)
Since you don’t need to export a firing system script for a manually fired show you can actually choose any firing system in Finale 3D for addressing a pin board show. However, Finale 3D comes with a firing system option called “Pin Board” that conveniently has pre-made “Module Type” configurations that match the common pin board pin configurations, with 32, 36, 45, 48, 50, 100, and 400 pins. The easiest way to address a pin board show is to choose the Pin Board addressing system and select the Module Type that matches the number of pins and banks in your electrical firing system. If the exact pin number configuration isn’t one of the standard options, you can make a custom module variation to match whatever you need. Full documentation for the “Pin Board” firing system is here.
When designing a show for voice cues, you need to take care not to make shots too close together, or the operator may get confused or not have enough time to react to the voice cues. As a rule of thumb, somewhere between 0.75 seconds and 1.5 seconds is a good minimal spacing between shots. To get a feel for whether the voice cues are too close together, you can turn on voice cues for playback in interactive mode while editing the show, with the menu item, “File > User settings > Turn voice cues ON for playback”. The hot key toggles this setting if you need to switch back and forth.
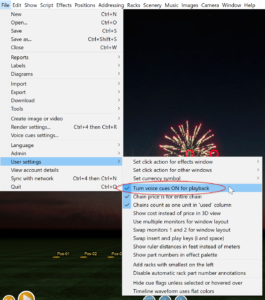
Figure 4 – Toggle “Turn voice cues ON for playback” if you want to hear the voice cues while designing the show.
Handling non-standard pin board numbering systems
The pin board firing system described in the Pin Board section has configurations for most of the standard numbering systems, but if yours isn’t in the list you can create a custom module from the “Addressing > Addressing settings > Set custom module specifications” menu item, which presents the dialog shown in Figure 5. Full instructions for custom module addresses are in Custom module specifications. The example in this section is tailored toward non-standard numbering systems in pin boards.
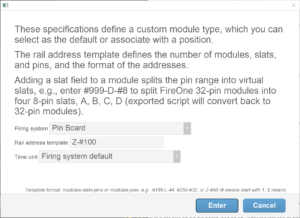
Figure 5 – Configure a custom module type if your pin board’s numbering system isn’t one of the standard ones.
The “Rail address template” of a custom module shown in the middle of the dialog of Figure 5 defines the numbering system, which can contain modules, slats, and pins; or just modules and pins. For pin board systems, the modules and slats usually correspond to the banks of addresses on the pin board, and usually the pin board only has one set of banks so it suffices to represent the pin board simply with modules and pins (no slats), like the default settings shown in Figure 5. The rail address template Z-#100 means the “modules” (banks) are lettered A-Z; the #100 means that each module has 100 pins, starting with 1 (the # sign means start with one; if it is missing the numbers will start with zero).
If your pin board numbering system is not one of the standard ones, you may be able to write a rail address template to represent it as a custom module. Consider a pin board with pins numbered in groups of eight, “A11, A12, A13, A14, A15, A16, A17, A18, A21, A22, A23, … all the way up to A88, then starting over with B11, B12, B13 … “. You can represent this numbering system using letters for the modules and numbers 1-8 for the slats, and numbers 1-8 for the pins: Z-#8-#8. With this representation the “Rail” address comprises both the letter and the first digit of the number (1-8); the “Pin” address is the second digit (1-8).
In reality, the addressing banks of this firing system correspond to the letters alone, and the pins correspond to the numbers alone (both digits together), but since the pin board’s numbering system doesn’t have a contiguous sequence of numbers for the pins (e.g., A19 and A20 are missing in between A18 and A21), you need to represent it in Finale 3D using modules and pins and slats.
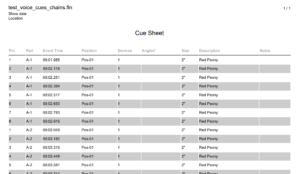
Figure 6 – The operator can follow the cue sheet.
The cue sheet in Figure 6 shows the result of using this custom rail address template, Z-#8-#8. Although the combination of rail and pin addresses matches the pin board, the voice cues will be slightly different for two reasons. First, for addressing systems with modules and slats, the voice cues articulate only the slats. Thus for this pin board the voice cues will ignore the modules. The reason is that articulating both the module and the slat is more information than the operator usually needs. Articulating just the slat when it changes is sufficient because the operator can see the module change coming up and doesn’t need a reminder. Second, the voice cues always articulate the modules or slats using the military alphabet, and the pins using numbers. Thus for this pin board the groups of eight pins are always numbered 1-8. The reason is to prevent the operator from confusing modules and slats from pins as they are spoken.
In this particular example, it isn’t ideal that the voice cues articulate only the slats and that the slats are articulated in the military alphabet. The first 64 pins of this pin board system A11-A88 will be vocalized as,
Alpha 1,2,3,..8, Bravo 1,2,3,..8, … Hotel 1,2,3,…8
and then the next 64 pins B11-B88 will be vocalized exactly the same, as,
Alpha 1,2,3,..8, Bravo 1,2,3,..8, … Hotel 1,2,3,…8
The operator listens to the count of eight pins, and then hears a military alphabet letter as the indication to move to the next row of eight pins on his pin board, and so on. After the last row of pins, the operator will hear “Alpha!” again and will know to advance the bank letter of the pin board from A to B, or to whatever the next letter is. The cue sheet has the exact match of the addresses so if the operator is following along with the cue sheet, he’s always got a reference in case he gets lost.
One voice cue per track
Ordinarily, the Track field of the script has nothing to do with voice cues, but if your firing system or manual firing method requires only one voice cue per track, you can select the “One voice cue per track” checkbox on the voice cues settings or export dialog, as shown in Figure 7.
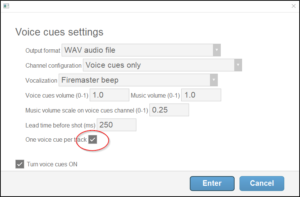
Figure 7 – If you check “One voice cue per track” then only the first event of each track will generate a voice cue.
Parente Firemaster is one of the firing systems that require one voice cue per track. Although each track may contain multiple addressed events, the firing system fires the track sequence of events when triggered. The voice cue beep is the trigger for the entire track.
Table 1 – Example files
| Download link | Explanation |
| test_pin_board.csv | Example exported file (CSV) |
| test_pin_board.fin | Example show file |
| Example voice cues with pin number only | |
| Example voice cues with pin number and beep | |
| Example voice cues with pin number and buzzer; music in right channel | |
| Example voice cues with Firemaster beep |