Finale 3D provides for basic inventory management as described in Basic inventory management in Finale 3D, which obviously includes deducting a show’s product quantities from stock counts. Finale 3D also provides an integration with Finale Inventory, which expands the capabilities of inventory management to include stock reservations, sales orders, packed shows, quotes, and other real world complexities. Documentation on these inventory management options, however, is tailored to the company doing the inventory management. What if you have scripted a show in Finale 3D using a product list from a 3rd party company, and you want to provide that company with the product quantities used in your show so they can be reserved or relieved from that company’s stock counts? This section explains how to export the data, and walks through an example of how a 3rd party company might import your data as a stock change using Finale Inventory.
You may be in a situation in which you have no idea what inventory management system the 3rd party company is using. Your responsibility may be simply to give that company a list of product quantities from your show in a format that can be processed. From Finale 3D, do the menu item “File > Print > Report > basic_product_totals_portrait” (portrait vs. landscape doesn’t matter in this case) and in the file selection dialog, choose XLS or CSV as the output file format, instead of the default PDF. That will product a report like the one shown in Figure 1.

Figure 1 – Printing the report “basic_product_totals_portrait” and choosing the XLS file format.
The two important columns in this report are the Part Number column, and the Devices (quantity) column. The other columns are useful to keep around as a sanity check, but one can assume, if you are providing quantities for specific products, that your part numbers match the inventory system that they will be applied to. If you are given the choice, the XLS file format is usually preferable to CSV because importing CSV data into Excel is prone to errors like Excel removing leading zeros from part numbers, if you are not careful.
Example of importing the product quantities into Finale Inventory
The mechanics of importing the product quantities as a stock change or sale order in an inventory system will obviously depend on the inventory system, but using Finale Inventory as an example, the process will be something like the sequence of steps described here.
The first step will be to open the product quantities file in Excel and reformat the data as required for the inventory system. Finale Inventory uses the term Product Id to mean the same thing as Part Number in Finale 3D. Finale Inventory also expects to see a Quantity column, which is often called Devices in Finale 3D to be unambiguous with respect to chain counts. If you simply want to relieve these product quantities from stock on hand in Finale Inventory, you can do a “Stock Change” operation. In preparation for this operation, you can manually add two columns to the product quantity file, Product Id and Quantity. The Product Id column simply refers to the Part Number column values with an Excel formula. The Quantity column refers to the Devices column, negating the value so the stock change operation will deduct the product quantities from inventory counts. The modified file prepared for importing into Finale Inventory is shown in Figure 2.

Figure 2 – Adding the two required columns and negating the quantity” and choosing the XLS file format.
The Devices column in the report produced from Finale 3D counts the number of devices, meaning individual shells or other physical units. Thus chains count as the number of shells in the chain. If the convention being used for inventory management is that chains count as one item, then you will need to divide the chain quantities by the number of shells in the chain in the XLS file before importing.
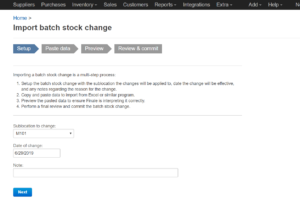
Having prepared the data, you can select “Import” from the home page in Finale Inventory, and the “Batch stock change” as the operation to be performed. You select the sublocation to apply the change to, as shown in Figure 3.

Figure 3 – Importing as a batch stock change in Finale Inventory and choosing the XLS file format.
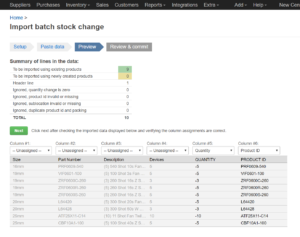
Figure 4 shows the next page in Finale Inventory, after copying and pasting the data from Excel into the input box on the Finale Inventory page. Notice that only the Product Id and Quantity column are recognized. The other columns are ignored because their column headers don’t match any of the columns relevant to the stock change operation. If a Product Id in the imported data did not match an existing product definition in Finale Inventory, you would see that in the form of a warning on this page. If there are no warnings, the operation will be a success. Click “next” and you are done!

Figure 4 – Columns with matching column headers import.” and choosing the XLS file format.