There are few features in Finale 3D that are more immediately delightful than “Make into fan…”, which arranges the selected effects in a fan as in Figure 1. Like the Make into sequence function, the fan function is a simple concept but has more subtlety in its options than meets the eye.
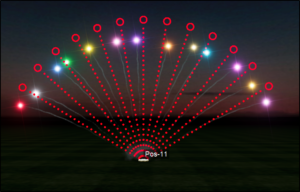
Figure 1 – Select the effects and do “Make into fan…” to spread them out in a fan.
Many of the fan variations in choreography come from combining “Make into fan…” with “Make into sequence…”. You can do the two operations in either order, starting with a fan and then putting its effects into a sequence; or starting with a sequence and then putting its effects into a fan. Think of the fan function as spreading out a list of effects A1, A2, A3, … An into a fan with angles going left to right. The first effect, A1, will aim to the left and the last effect, An, will aim to the right. If the effects launch from the same position at the same time, as in Figure 1, then it probably doesn’t matter much which effect is A1, but if you arrange the effects on the timeline before putting them into a fan, then it matters quite a lot which effect is A1.
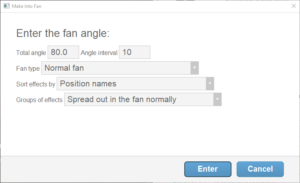
Figure 2 – The “Make into fan…” function can be used in concert with the “Make into sequence…” function.
The “Sort effects by” selector of Figure 2 has the options shown in Figure 3. If you are arranging your effects on the timeline before putting them into a fan, then the three time based options are the natural choices for sorting the effects. The “Effect time” option makes the first effect on the timeline be A1, producing a fan that sequences left to right. The “Effect time, center to outside” option makes the first effect or pair of effects on the timeline the center of the fan, half way in between A1 and An in the fan. The third option obviously starts with the first pair of effects on the timeline as the outside shots of the fan, A1 and An themselves.
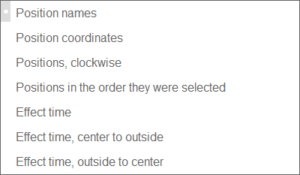
Figure 3 – The “Sort effects by” selector has three options to use if you’ve already sequenced the effects on the timeline.

Figure 4 – The “Fan type” selector has a few options that you can use in combination with other features.
When fanning effects across multiple positions, the “Fan type” choice of Figure 2 provides an option for an inward pointing fan, as in Figure 4. The normal fan and the inward fan are common choreography arrangements in their own right, but you can also use them in combination with the “Script > Reorder > Reverse order” function and the drag-and-drop user interface to make more esoteric designs.
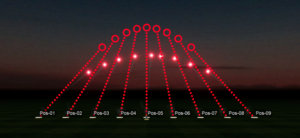
Figure 5 – The inward fan can be just a starting point for more esoteric designs.
Consider the inward fan of Figure 5 as just a starting point. If you select the effects and then drag the angle donut at the top of the left effect’s trajectory dots to make it straight up, you’ll get the fan of Figure 6. Experiment with this idea using the reverse function and trying different sequence rates to produce patterns that seem to crawl their way across a line of positions or produce Spirograph-like cusps in the air.
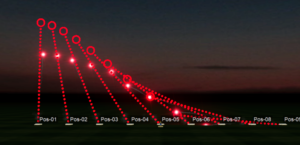
Figure 6 – Drag the left effect’s trajectory donut to make it straight up, and the fan will take on an entirely different character!
The “Circle fan” option of Figure 4 divides the total angle, which is generally 360 degrees for circles, into even intervals between the effects arranged in a circle. What’s the difference between that and a normal fan of 360 degrees? Normal fans have angle intervals in the gaps between each pair of effects, so if there are eight effects, for example, then there are only seven gaps. The total angle 360 divided by 7 is 51.4 degrees between each pair of effects. If you are arranging eight effects in a circle, you obviously want 45 degrees between them, not 51.4 degrees! The “Circle fan” option takes into consideration the gap that completes the circle from the last effect back to the first, producing angle intervals that are 1 / N the total angle rather than 1 / (N – 1), as shown in Figure 7.
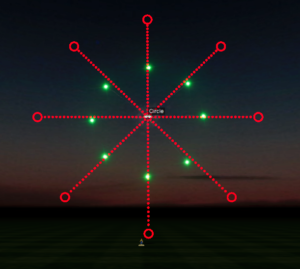
Figure 7 – The “Circle fan” option takes into consideration the gap after the last effect that completes the circle.
The two options in the “Groups of effects” selector turn grouping on or off for effects that launch from the same position or at the same time. Grouping is not as common a need for fans as it is for sequences (see Make into sequence) but if you have pairs of effects that you want to fire together as the same spoke of the fan, for example, then you can turn on grouping (“Stick together in the fan”) to keep them together.

Figure 8 – The two “Groups of effects” options amount to just the decision of whether you want grouping or not.
The grouping function will group by common positions if you are sorting by positions (see Figure 3) and will group by common times if you are sorting by times. Unlike Make into sequence the fan function does not group chain shells together as spokes of the fan because the angles are not unchangeable in the way that the fuses between the shells are.