The “Make into sequence…” function in Finale 3D arranges the selected effects in a sequence, as shown in Figure 1. The function can arrange the effects in a variety of patterns like center-to-outside or in-pairs. The function can sort the effects according to their position coordinates left-to-right on the screen or around a circle, or according to their angles. The function can create multiple cycles of the sequence. It can “bounce” the cycles back and forth, and optionally remove the doubled up turnarounds on the ends. The function can handle chains and G-key groups to make sequences of subsequences. The function can keep pairs together. In combination with some drag-and-drop user interface, the function can create sequences at different phases. In short, while the “Make into sequence…” function is a simple concept, you can use it in a variety of ways in your choreography.
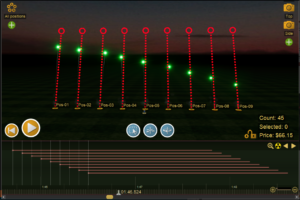
Figure 1 – Select the effects and do “Make into sequence…” to spread them out evenly in time.
Aside from the duration and interval, which have obvious meaning, the “Make into sequence…” dialog offers selectors for sorting the effects and for handling groups of effects. With the default choices of Figure 2, the sequence will sort the effects by position first, breaking ties by time. It will treat each effect as a separate time point, with the one exception of chains which it treats atomically as single time points without affecting the internal timing of their shells.
The default settings from Figure 2 make sense if the sequence runs across a line of positions, but if the sequence is applied to a fan of effects at a single position, then sorting effects by position name doesn’t have any effect. If you are putting a fan into a sequence, you should sort effects by angle, choosing any of the bottom four options in Figure 3.
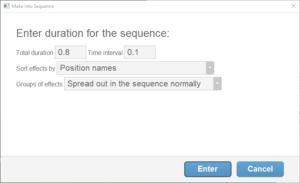
Figure 2 – The “Sort effects by” selector has patterns options.
The angle options at the bottom of Figure 3 offer four patterns for the sequence. The position options also include the same four patterns, for three different manners of sorting the positions — by their name, by their coordinates left-to-right on the screen, and clockwise around a circle.
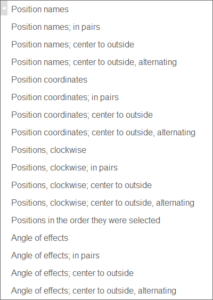
Figure 3 – Four different patterns are possible for angles or positions (and three sorting options for the positions).
The default setting for the “Groups of effects” selector — “Spread out in the sequence normally” — treats every effect as a separate time point (with the exception of chains). If you change the selector to “Stick together as subsequences” then groups of effects at the same position, angle, time, or G-key group will be treated atomically as subsequences. This option enables you to put subsequences into sequences without interfering with the internal timing of the subsequences.
If the “Sort effects by” selector is any of the position based sorts, then the “Stick together as subsequences” option will recognize all the effects at each position as a subsequence, and will keep them together; if all the effects are at the same position, then the option will recognize effects at the same effect time as subsequences, like pairs or flights on the timeline which are a kind of subsequence.
If the “Sort effects by” selector is any of the angle based sorts, then the “Stick together as subsequences” option will recognize effects at the same angle as a subsequence; if all the effects are at the same angle, then the option will recognize effects at the same effect time as subsequences.
If any of the selected items are in G-key groups (from the “Script > Groups > Combine as group” menu item), then the groups are treated atomically if the “Stick together as subsequences” option is chosen, and all effects not in the groups will be treated as independent time points in the sequence.
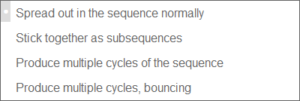
Figure 4 – The “Groups of effects” selector enables sequencing subsequences or making multiple sequences.
The final two options in the “Groups of effects” selector produce multiple cycles of the sequence. These options use only the existing selected effects for the cycles; they do not clone or add effects. Thus if you want N cycles of a sequence, you need to begin with N copies every effect in the sequence. Consider the sequence of Figure 1, which has just nine effects, one at each position. If you selected those nine effects and duplicated them (Control-D) a couple times into four times as many effects in total, then you’d have the right number of effects to make four cycles of the sequence. This simple example is a fine way of producing multiple cycles of a sequence:
- Select all nine positions.
- Click one of the effects in the effects window to add one effect to all nine positions.
- Click again, N times in total if you want N cycles of the sequence.
- Select all 9 * N effects, and do “Make into sequence…”
- Choose either of the multiple cycles options in the “Groups of effects” selector.
- That’s it!

Figure 5 – Bouncing sequences across positions usually look better if the turnarounds are not doubled up.
The term “bouncing” means a sequence whose cycles go back and forth, like the zig-zagging shown in Figure 6. Bouncing sequences across positions generally look better if the turnarounds are not doubled up, but that means fewer effects are needed at the end points. When you select the bouncing option, Finale 3D recognizes if the end points would be doubled up and offers to remove the duplicates, as shown in Figure 5. If the selected effects already have the proper number of effects at the turnarounds then you won’t get the dialog. The dialog just makes it easier to create bouncing sequences, since it is easy to add the same number of effects to every position.
Figure 6 shows a bouncing sequence across a line of positions. Bouncing also applies to fan sequences. Unlike sequences across positions, bouncing sequences in cakes such as X-shape or Z-shape cakes usually do have doubled up effects on the turnarounds due to the way they are constructed in slices. So if you are using the “Make into sequence…” function to create a cake simulation you will probably select “No” to the dialog of Figure 5.
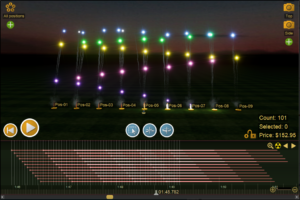
Figure 6 – Zig-zags are just one of the bouncing patterns that are fun to watch.
Referring back to the beginning of this article, the first paragraph mentions a drag-and-drop user interface for creating sequences at different phases. The word phase just means starting the sequence from a different position. If you want to start a sequence going around a stadium at a particular spot, you’ll need to drag-and-drop the sequence to start at a different position after creating it. The technique is described in Dragging a sequence to start from another position.
