While many of the functions in Finale 3D are aimed at pyromusicals, there are a few functions that can save you time scripting manual shows. In some cases, they can lead to a better result than would be possible without computer assistance. If you are scripting a manual show, you should familiarize yourself with the voice cues support described in Voice cues basic instructions and the “pin board” firing system described in Pin Board, which may factor into your production work flow. The present section focuses on the design process.
Table 1 – Functions relevant to scripting manual shows
| Function | Menu | Explanation |
| Spread out evenly | Script > Sequences | Arrange selected effects as sequence with uniform gaps between the effect times. |
| Spread out based on effect durations | Script > Time adjustments | Arrange selected effects as sequence with uniform gaps between the the dissipation of an event and the break/effect time of the next event. |
| Align event times to frame rate | Script > Align | Adjust the event times of all the selected effects to align with the frame rate, which can be 1 second intervals for spacing effects on full second time points. |
| Randomize | Script > Reorder | Reorder the selected effects randomly, shuffling the times. |
| Add time variance | Script > Add time variance | Add random amounts to all the times, to make them less robotic. |
| Re-align cues to their event time | Script > Time adjustments | For each group of effects having the same effect time (collectively, a “cue”), adjust the times if they have different prefires so that the event times of all the effects of the cue align, which will cause the effect times to not align if the prefires are different. |
| Insert minimum separation | Script > Time adjustments | Insert extra time between any consecutive events with less than the minimum separation of time between their event times (or optionally their effect times, but event times are more relevant to manual shows). |
| Speed up cadence at end | Script > Time adjustments | Modify the times of an existing sequence, which may have irregular spacing between shots, to increase the rate of firing gradually toward the end of the of sequence, building toward a crescendo. |
| Set timeline snap-to resolution | Show | The “1 second” option for snap-to resolution supports dragging items on the timeline in 1 second intervals. Timeline snapping is always based on the effect time blips, so the snap-to resolution mode is useful before performing the step to align the event times (as opposed to effect times) to the frame rate. |
The list of relevant Finale 3D functions is shown in Table 1. These functions can be useful for scripting pyromusicals as well, but they have particular significance for manual shows. The best way to describe them is to walk through an example scenario that employs them together to script a section of a show. The example scenario is,
Given a list of effects to use in a section of a manual show, lay out the effects at a pleasing cadence, taking into account the effect durations, and the desire to have some pairs and different size shells mixed into the sequence. The cadence should be implementable by an operator pressing a button on a pin board while listening to voice cues or reading from a cue sheet. In other words, the cadence mustn’t be too fast. The cadence of the shots should build to a crescendo at the end of the section, in preparation for a finale. To simplify the cue sheet, the shots will be aligned to trigger times that fall on full second time points.
The scenario begins with the effects already inserted into the show, all at one time. The design procedure will spread them all out in a pleasing temporal arrangement. In a nutshell, the procedure is,
- Spread out the effects evenly so you can see them.
- Optionally drag some cues on the timeline to snap some pairs or stacks of shells together, choosing complementary effects.
- Randomize the order of the entire section.
- Spread out the randomized sequence of effects based on the effect durations.
- Optionally, speed up cadence at the end to build toward a climax.
- Re-align the cues to their event times so the pairs and stacks are a single cues for the firing system regardless of their prefires.
- Optionally, insert minimum separation to guarantee the operator has time to react to the voice cues.
- Optionally, align event times to 1-second resolution so the cue sheet is easier for the operator to follow.
- Optionally, turn on “Snap to resolution: 1 second by event times” to make manual adjustments.
The starting point for this procedure is illustrated in Figure 1. Twenty various effects have been inserted into the show, all at one time. These are the effects that are going to be arranged in an appealing sequence.

Figure 1 – The starting point: 20 effects inserted at one time.
1. Spread out the effects evenly
From the starting point, the first step is to spread the effects out on the timeline so you can see them and make decisions about what effects might look good in pairs. Choosing 40 seconds duration, the timeline will look like Figure 2.

Figure 2 – After spreading out the effects on the timeline, you can see them.
2. Drag some cues on the timeline to snap some pairs of shells together
Scrubbing back and forth on the timeline, you can see what effects you have to work with. You can snap some together that you think would look good as pairs, which results in the timeline looking like Figure 3.

Figure 3 – Drag effects on the timeline to make pairs of complementary effects; don’t worry about the timing.
3. Randomize the order
The initial sequence from Step 1 arranged the effects on the timeline in the order they were inserted, which happened to be all the 4″ effects (blue bars) followed by the 3″ effects (yellow bars). Do the randomize function to shuffle the order. Repeat the function multiple times if you want to pick a random order that looks better than the others. The results of the randomize function are shown in Figure 4. Notice that the function keeps together the pairs.

Figure 4 – The randomize function shuffles the order of effects, keeping pairs together.
4. Spread out based on duration
At this juncture the timing is a mess, but the order of shots and the combination of effects into pairs is correct. Apply the operation “Spread out based on effect durations” to fix the timing. The original sequence in Step 1 was spread out over 40 seconds, but the dialog from the “Spread out based on effect durations” operation indicates the “zero gap” duration is about 45 seconds. Although you can easily stretch the total duration later, it is usually easiest to begin with some small gaps. Figure 5 illustrates the result of choosing 60 seconds for this spreading out operation. The red arrows show the consistent gaps between the dissipation time an effect and the break time of the next effect.

Figure 5 – The gaps between the dissipation time of an effect and the break time of the next effect is consistent after spreading out based on duration.
5. Speed up cadence
The “Speed up cadence at end” function will speed up the cadence of the shots progressively over the sequence, building to a climax. The function presents a dialog with a choice of acceleration rate, from subtle to pronounced, 1-10. Choose the amount that feels good. Figure 6 shows the result of an acceleration rate of 6 for this sequence. The red arrows illustrate gaps. Comparing Figure 6 to the previous Figure 5, you can see that after the cadence function the gaps at the beginning of the sequence are much larger than the gaps at the end. In fact, the shots at the end get squeezed together so much that the gaps are negative! The red circles in Figure 6 indicate gaps that are small or negative. You can clearly see the progression from left to right.
Because the effects are different durations, the gaps between the effect times are irregular. Look at the cue flags along the top of the timeline in Figure 6. Can you tell from the cue flags that this is an accelerating sequence? It would be hard to guess! Yet if you look at the gaps illustrated by the red arrows and circles, you can see that the sequence accelerates in a pronounced way. By the end of the sequence, the effects are stepping on each other, which is in stark contrast to the luxurious spacing at the beginning.

Figure 6 – Red arrows point out the large gaps on the left; red circles point out small gaps in the center, and negative gaps on the right!
6. Re-align the cues to their event times
Electronic firing systems may have “macro” or “sequence” capabilities, but manual shows shot with a pin boards require a single ignition pin per cue. It is thus necessary to align the event times of the effects of a cue, rather than the effect times. Finale 3D‘s timeline user interface and scripting features are principally based on the effect times, so the easiest way to script a manual show is to design the show with cues of effects having the same effect times (the blips aligned on the timeline and the effects sharing a cue flag), and then convert the cues to alignment based on event times when you get to the stage of your design process in which you are making the show operational.
The “Re-align cues to their event times” function does this operation for the entire show in one step. Select everything and apply the function. The result in this scenario is shown in Figure 7. The circled areas show the changes. You can see the left ends of the pairs of different sized effects have become aligned, and as a consequence the blips of the effects have become unaligned.

Figure 7 – Aligning the event times of pairs of different size effects is required for pin board firing systems.
7-9. Insert minimum separation and align event times to seconds
The “Insert minimum separation” function provides a guarantee that event times are not too close together, based on the separation time you specify. For fast sequences, you may need to use this function to ensure the operator can fire the show. Optionally, the “Align event times to resolution: 1 second” function can be used to align the effect times of the shots to full seconds, without fractions, which makes the cue sheets easier for the operator to read at the expense of timing resolution. These functions produce subtle changes in the timeline, shown in Figure 8. The benefits are more clear in the cue sheet shown in Figure 10.

Figure 8 – The final steps — insert minimum separation and align event times to seconds.
Preparing the script
Steps 1-9 illustrate an example design procedure for a section of a manual show. Obviously this procedure can be combined with other procedures to script a full show, and the functions used in this procedure may be applicable in other contexts. To close the story of this scenario, Figure 9 and Figure 10 show the production steps for addressing the show and printing a cue sheet. Table 2 provides the example files if you want to download and look at them.

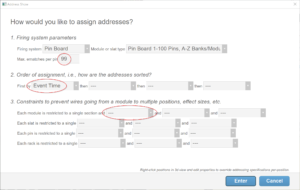
Figure 9 – To address a manual show with a single firing system pin per cue, 1) set max e-matches to a large number, 2) sort chronologically by event time, and 3) remove all the constraints.
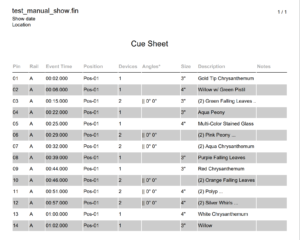
The “Addressing > Address show…” function assigns firing system addresses for the manual show. Figure 9 points out the important three requirements for addressing manual shows. The full details of the addressing procedure are described in Pin Board. After addressing the show, you can print out the cue sheet as a standard report, which produces what you see in Figure 10. If you want voice cues for your show, the procedure is described in Voice cues basic instructions. Example files for this show, and the cue sheet, and the voice cues, are provided in Table 2.

Figure 10 – The cue sheet for this manual show example.
Table 2 – Example files
| Download link | Explanation |
| test_manual_show.fin | Show file |
| manual-show-cue-sheet.pdf | Cue sheet |
| Voice cues |