After you lay out the racks in the rack layout view, the addressing functions like “Addressing > Address show” may fill in the firing system pin numbers starting with the wrong rack, from your perspective. To fix the problem, you can adjust the order of the racks.
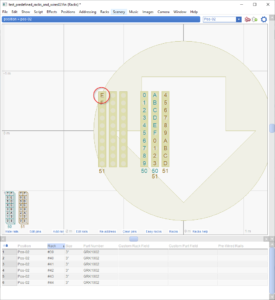
Figure 1 – If you would prefer the top left tube to be module 50, pin 0, the racks are in the wrong order.
The rack layout of Figure 1 shows six 3″ racks in two clusters. The addressing function appears to assign firing system module and pin numbers starting with the right cluster of three racks, wrapping around to the left cluster of three racks. The tube in the top-left (circled in Figure 1) is thus assigned a firing system address of module 51, pin E. It would be natural to want something different. Perhaps you want this tube to have the address: module 50, pin 0.
The reason the racks on the right are assigned the lower firing system addresses is that their rack numbers are lower numbers than the rack numbers of the racks on the left. The rack numbers are shown in the “Rack” column in the table below the rack diagram. The three selected racks (circled) have the rack numbers 39, 40, and 41, as you can see in the three selected rows in the table in Figure 2.
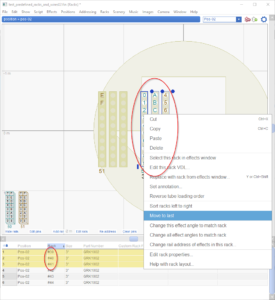
Figure 2 – To correct the problem, move the three racks on the right to be “last”.
To force the three racks on the right to be addressed after the three on the left, select them and right click on them to do the function “Renumber left to right” from the context menu, which brings up a dialog with a field, “Starting with rack number”, and with a checkbox, “Start after all other racks”. To move these three racks to last, just check the checkbox and click okay.
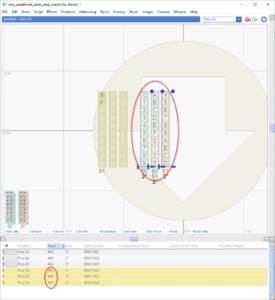
Figure 3 – The “Renumber left to right” function changes the rack numbers in the “Rack” column.
The “Renumber left to right” function changes the rack numbers in the “Rack” column, making them larger than any other rack numbers. Notice in Figure 3 that the three selected racks that used to have rack numbers 39, 40, and 41 now have rack numbers 45, 46, and 47, making them last.
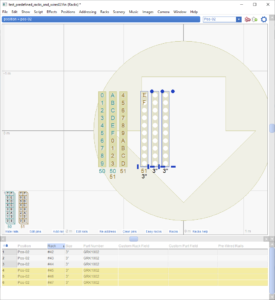
Figure 4 – After you adjust the rack numbers in the “Rack” column, the addressing function assigns addresses in the correct order.
Once you’ve changed the rack numbers to be in the order you want, repeat the “Addressing > Address show” function to re-assign firing system addresses, considering the racks in order. You can achieve the desired result shown in Figure 4 — the top-left tube having the address: module 50, pin 0!
You may also find it easier to edit the rack numbers directly in the table by hand instead of using the “Renumber left to right“ function. Rack numbers need to be unique, which means it is difficult to swap two numbers without temporarily assigning one to a temporary number to move it out of the way.
Renumber functions
In addition to the “Renumber left to right“ context menu function, the main menu item “Racks > Renumber all racks consecutively” will compact all the rack numbers to a consecutive sequence from 1 to N by eliminating any gaps. Please see Renumber racks for examples and more information about renumbering racks.