Before you launch into complex topics like importing your inventory or defining racks, let’s get started by putting together a little show. We’ll layout some launch positions, add a few effects, do some scripting functions like fans and sequences, and make a quick video so you have something to show for it. This short exercise will prepare you for addressing and exporting a script for your firing system in the next step (see Creating and exporting a script for your firing system). Our getting acquainted plan boils down to:
- Layout positions
- Insert effects
- Create a fan and a sequence
- Create a video
Layout positions
After launching the product, click the padlock icon in the lower right to unlock the positions, as shown in Figure 1. Try dragging the positions around on the grass. The circular blue buttons at the bottom of the simulation view are the navigation buttons: to orbit the scene around to see it from different angles; to translate the scene in the ground plane, and to drag a selection rectangle for selecting positions or effects.
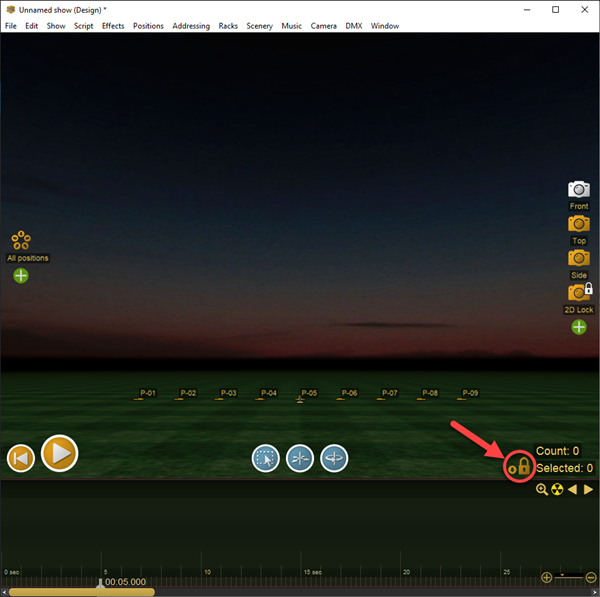
Figure 1 – The padlock unlocks the positions.
The camera icons on the right side of the screen are camera view shortcut buttons to view the scene from different views, like above, front, etc. If you click the green plus sign, that will create a new shortcut button for the current view. You can then click on the new button’s name to rename it to something you can remember. It is common to set up a dozen or so of these camera shortcut buttons to view the scene quickly from useful angles when scripting.
The flower-like buttons on the left are position group shortcut buttons. Clicking these buttons selects a group of positions. When scripting, it is common to insert effects into a group of selected positions all at once, like the “front” positions, or “shells”, or “left-side”, “every-other”, etc., so it is useful to create position group shortcut buttons for the common groups. Just like the camera view shortcut buttons on the right, you can click on the names of these buttons and give them useful names or delete them.
Once you feel comfortable moving positions around, you can try the functions in the Positions menu. Try inserting 50 positions and arranging them into a circle! If you feel adventuresome, add a model of a stadium or tower to the scene from the Scenery menu, and then try moving the positions around on the model. Notice that the positions automatically attach to the surface of the model and slide to whatever you are pointing to. If you need to move the model, right click on it, and unlock the model from the context menu; then lock it again when you are done moving it.
The positions have arrows on the top of them, which should point to your point of reference. Usually the point of reference is the audience, but it may be the center of the circle for a circle of positions, or other point for other situations. Right click on a position and select “Rotate (heading)” from the context menu. Notice as shown in Figure 2 that you can now rotate the position by dragging the red arrow. If you extend the red arrow to be long, then you can drag in individual degrees; if you make the red arrow short, the rotation snaps to 5 or 22.5 degree intervals. If you select multiple positions, and then right click one of them to rotate, the full set of selected positions will rotate around the position you clicked on.
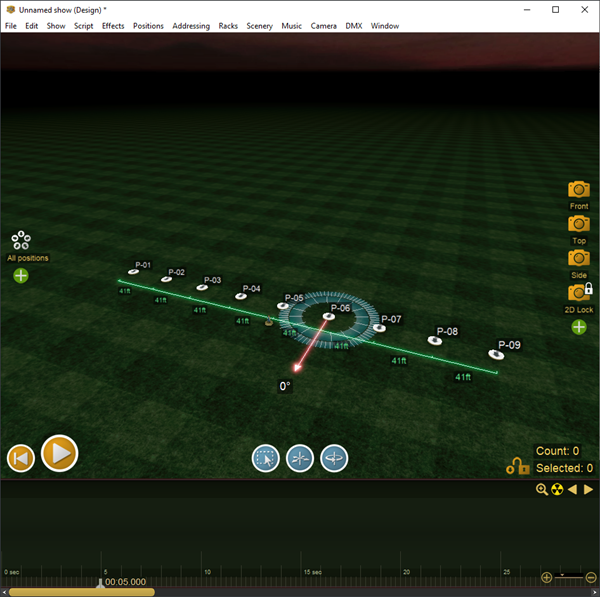
Figure 2 – Rotation widget snaps to 1 or 5 or 22.5 degrees.
You’ll find there are other useful functions in the Positions menu and the context menu from right clicking on positions or on the ground, such as “Aim positions at this point”.
Insert effects
Insert effects by clicking on the icons in the Effects window. If you click and release on the icon, the effect will be inserted into the currently selected positions, at the current timeline time as indicated by the playhead on the timeline (the split white vertical lines on the timeline). If you click and hold down on the effect icon and drag-and-drop it to the timeline or to a position, that will insert the effect at that indicated point on the timeline or just the indicated position. After inserting some effects, move the playhead to the left of them on the timeline or press the rewind button in the lower left of the design view, and then press the play button in the lower left of the design view or press the space bar to start the show playing. Take a look at your effects!
The Effects window contains multiple collections of effects which you can switch between using the blue collections selector near the upper right corner of the Effects window. The set of available effect collections includes Generic effects, Per-show effects, My effects, and (optionally) supplier catalogs and Finale Inventory accounts. Generic effects is the built-in collection of effects so that you have something to get started with. Per-show effects are the effects that are used in the current show and saved along with the show file. Whenever you insert an effect into the show from any collection, the effect definition is copied into Per-show effects so the show doesn’t have any external references. This way, you can send your show file to a friend, and you don’t have to worry about your friend needing the same effect collections that you have; the show file is stand-alone.
My effects is your own private collection of effects that is stored in the cloud. Supplier catalogs and Finale Inventory accounts are shared collections, which you can learn about here: Account setup. You can also import and load/save collections of effects as database files (.fdb format) stored locally on your computer.
You can create new effects simply by typing in an English description into the dialog from the menu item “Effects > Create effect…”. The software will create a simulation automatically based on your description, which is pretty amazing to see. It doesn’t understand proper names of consumer cakes, but it does understand the full language of pyrotechnics (called “VDL”), so you can type things like: “50mm Red To Blue Chrys w/ Crackle Core w/ Green Mine” or “49 Shot 10s 50mm Red Comet + Blue Tail Z-Shape Cake” and you’ll get good simulations! To learn more about creating simulations, check out the Visual Descriptive Language (VDL) documentation. When you create a new effect, you can give it a part number to identify it and you can choose what collection to put it in. By default, it usually goes into My effects. After adding effects to My effects, be sure to save you work by going to “File > Sync with network”
Choreographers of pyromusicals often listen to the soundtrack and insert empty cues at important points in the music while the music is playing. You can do that in Finale 3D by pressing space or the play button to start the show playing, and then pressing the “i” key for insert. If you prefer using the space bar to insert empty cues you can swap the “i” and space bar in the “File > User settings” menu. Of course, you need a soundtrack to listen to, so go to the Music menu and add an MP3 or WAV to the timeline.
Create a fan and a sequence
Once you’ve inserted some effects in the show, you can drag them on the timeline to move them forward or backward in time. You can also select them in the script window or in the design view. In the design view you can click on the trajectories to drag them from position to position, or you can click on the doughnut at the top of the trajectories to angle them. If multiple effects are selected when you angle them, you will tilt all of them together. Try inserting 50 positions, then arrange them into a circle, insert a comet into all of them (clicking on an effect icon when all 50 positions are selected), and then drag the doughnut at the top of one of the trajectories while they all are selected, as shown in Figure 3. Angling the effects when viewing from different points of view will angle them on different axes.
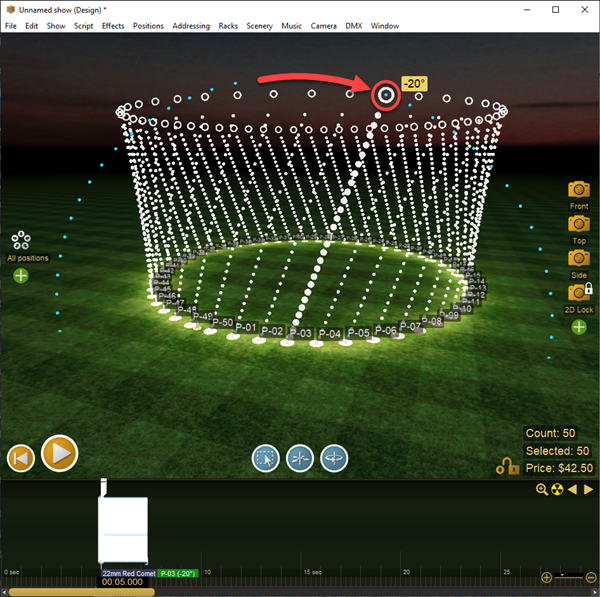
Figure 3 – Grab the doughnut at the top of the trajectory to angle effects.
Having angled all the comets in the circle, try playing it through once by pressing the space bar. Impressive, but wouldn’t this be an ideal point to create a sequence? Select all 50 comets on the timeline, and do the menu item “Script > Sequences > Make into sequence…”. Choose the duration for the full sequence or the interval, press OK, and look at the chase around the circle! Try experimenting with the other sequence functions in the Script menu, such as accelerating sequences or slow-in, slow-out sequences. In general, all the scripting commands in Finale 3D apply to the currently selected set of effects, analogous to the way the “Positions > Arrange into pattern” commands apply to the selected set of positions.
It should not be surprising, then, that the “Make into fan…” command in the “Script > Angles” menu also operates on the selected set of effects. The circle isn’t a great setting for a fan, so try inserting 10 new positions (“Positions > Add> Multiple positions…”) and arranging them into a line (“Positions > Arrange into pattern > Into a line…”). To differentiate these positions from the circle positions, right-click on one of the new line positions while all of the line positions are selected, and select “Rename” from the context menu and rename them “Line”. Notice how all the selected positions get renamed, with numbers added automatically. At this point you may want to click on the padlock in the lower right in order to drag the line of positions to avoid interfering with the circle. Then click on the padlock again to lock the positions.
The line is a good starting point for creating a single fan, and some fancy patterns involving multiple fans. To begin with, insert a comet into all 10 positions of the line by selecting the positions and clicking a comet effect icon. At this moment, all 10 comets are at the same time on the timeline, and aim straight up. Leaving them selected, do the menu item, “Script > Angles > Make into fan…”. Choose 90 degrees or some other angle spread, click OK, and admire your fan in Figure 4.
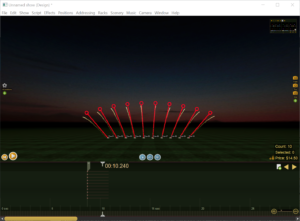
Figure 4 – “Script > Angles > Make into fan…” operates on all selected effects.
Now let’s get fancier and create some patterns involving multiple fans. Press Ctrl+Z to undo your fan, returning to the 10 straight-up comets. The undo and redo commands are also available from the Edit menu. You can undo all the way back to the beginning of your session and redo all the way back. The undo/redo functionality is important for visual scripting, because it enables you to try things out, see how they look, and repeat with variations until you get the design you want. So, with the 10 straight-up comets selected, do the menu item, “Script > Duplicate > Duplicate into flights…” and choose 5 shots per flight, separated by 30 degree intervals. Since this scripting command operates on all 10 selected effects, each of the 10 selected effects gets duplicated into a fanned out flight of 5, for a total of 50 comets, as shown in Figure 5.
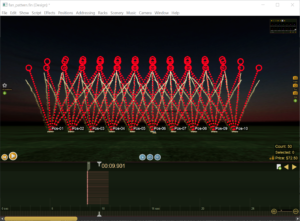
Figure 5 – “Duplicate into flights…” duplicates every selected event into a fanned flight!
Leaving all these 50 comets selected, once again do the command, “Script > Sequences > Make into sequence…” but this time select “Center to outside” as the pattern, and select 0.5 seconds interval, and check the “grouping” checkbox. With the grouping flag on, the sequence will apply to the natural groups of the effects instead of to the effects individually. In this scenario, each flight on each position is a natural group, so with the grouping flag on, the sequence operation sequences the entire flights relative to each other, leaving the the shots within each flight as a same-time fan. The result is shown in Figure 6. To cement your understanding of the “grouping” checkbox, press Ctrl+Z to undo and repeat the operation without checking the checkbox, and notice the difference.
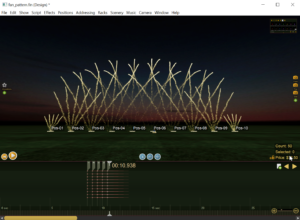
Figure 6 – The Grouping checkbox preserves each flight, sequencing them relative to each other.
This pretty pattern of 50 comets in cascading flights of five may be nice to repeat a few times in the show. Using Ctrl+C and Ctrl+V to copy/paste selected effects is a quick way to build up a show in sections. When you press Ctrl+C, whatever is selected is copied into the copy buffer, including positions and effects. When you press Ctrl+V, what gets pasted depends on what’s in the copy buffer and what is currently selected. If you copy effects across multiple positions, and then paste, the copied effects will be duplicated at the current timeline position indicated by the playhead, on the same positions as the effects were copied from. If you copy one or more effects from a single position, and then paste, the copied effects will be duplicated on every selected position. So, for example, if you select the entire 50 comet pattern on the timeline (try this now!), and then move the playhead to a later point on the timeline, and then paste, you get a clone of the entire 50 comet pattern at the later time. However if you copy just one of the flights of 5 comets from a single position, and then paste with, say, two of the positions selected, then the flight of 5 comets will be duplicated at each of the two selected positions.
Create a video
The set of scripting functions described in the last sections — effect icons that insert at the selected positions, menu items that operate on the selected items, the undo/redo hot keys, and the copy/paste hot keys are the foundation of scripting in Finale 3D. These user interface paradigms work together to create a visual scripting environment in which you design a show interactively until every detail looks exactly the way you want.
The exercises in the previous sections leave you with a little show, of some sort. To create a video of the show, just go to “File > Create photo or video > Create video…” and modify the start/end times in the dialog to cover the time range you’d like to see, as shown in Figure 7. If you are using the Hobbyist version of Finale 3D, the resolution limit is 720p. If you are using the Pro version, maybe start with 1080p, though later you could experiment with 4K resolution or ultra-high frame rate for ultra-high quality. The video will just take a few minutes to render per minute of show time. It renders locally on your computer, using your GPU. It is saved as an MP4. When the video is done rendering, it will appear in your computer’s video player.
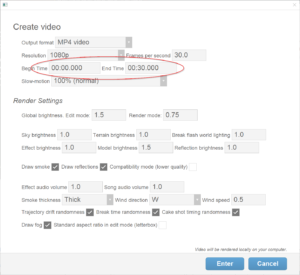
Figure 7 – Creating a video just takes a few minutes, using your own computer’s GPU.
If you want to explore making videos, try adding some reflective water from the Scenery menu, and read Camera animation for instructions to put the camera on a motion path to make an impressive fly-by!
