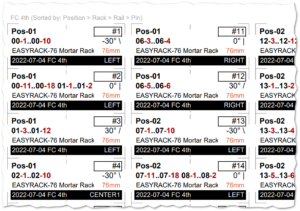
If you go through the trouble of laying out your racks in Finale 3D, then why not print out labels for the racks to help the crew set them up? An example sheet of rack labels is shown in Figure 1. You can tell by the look of them that they aren’t effect labels. The information they contain is a bit different also.

Figure 1 – Example rack labels
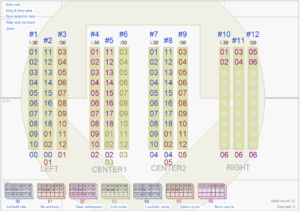
Rack labels go hand in hand with rack layout diagrams, as shown in Figure 2. The rack numbers just above the racks in the diagram match the rack numbers in the upper right corner of the labels. Thus the rack labels make it possible to conduct a stock take of all the required racks prior to the show, and the rack diagrams provide a map for the crew with the location and wiring of every rack, identified by its label.

Figure 2 – The rack numbers above the racks in the rack diagram match the rack numbers in the upper right of the labels.
The rack numbers are a key part of rack labels, so when you print out the rack diagrams make sure to print out “Rack layout (with rack numbers)” not “Rack layout (without rack numbers)”. When editing racks in the rack layout view, you can hide or show the rack numbers by clicking the “Show/hide rack numbers” link in the upper left of the view.
Since rack numbers figure so prominently, it is worth it to renumber the racks in a sensible order and to eliminate any gaps in the rack number sequence. If the show contains N racks then the rack numbers on the labels should be the numbers 1..N. To renumber the racks within positions, select the racks and right click for the context menu item, “Renumber racks left to right” as described in Renumber racks. To eliminate the gaps, do the main menu item, “Racks > Renumber all racks consecutively”.
What labels can contain
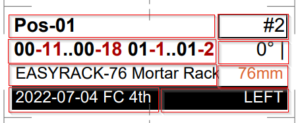
Like effect labels, the rack labels are comprised of eight fields of information, as illustrated in red rectangles in Figure 3. The position is prominently in the upper left and the rack number is prominently in the upper right. The labels are sorted by position first, then rack number.

Figure 3 – Rack #2 is in the LEFT rack cluster of Pos-01; it has pins 11-18 of module 00 and 1-2 of module 01.
The “LEFT” field in the lower right is the “Rack Cluster Annotation”. You can see the word “LEFT” below the left-most cluster of racks in Figure 2. The word “LEFT” is the annotation of one of the racks in that cluster, which you can set by right clicking the rack and choosing “Set annotation…” from the context menu. While each rack could have its own annotation, it is usually enough to set the annotation for just one of the racks in the cluster. You can drag the annotation to center it below the cluster so it appears to represent the entire cluster even though in truth it is associated with just one of the racks.
Importantly, though, all of the rack labels for the racks in the cluster need to include the word “LEFT”, not just the label of the one rack that owns the annotation. The Rack Cluster Annotation used for rack labels takes all this into account. Technically, the Rack Cluster Annotation is the first non-empty annotation of any of the racks in the rack cluster containing the rack that contains the effect of the script event from which the label is generated. The shorter explanation is that it just works the way you want.
The center four boxes in the label are the firing system addresses served by the rack, the angle of the rack, the size of the rack, and the rack’s part number and description. If your firing system addresses are too wide for the box or if you need to change other aspects of the rack labels, you can edit the blueprint template. Follow the instructions in Labels basic instructions.